Well this seems like an odd topic? After spending way too much time on this i found no decent documentation available online, especially not reflecting changes since 2018!
I installed phpipam on a Ubuntu 22.10 server, wanted to give it a certificate signed by our Microsoft CA, this is how you do it!
First create a .key file
mkdir /home/username/certificates
openssl genrsa -out ipam.sfo.rainpole.io.key 2048
Now from this .key, we will create a Certificate Signing Request (.csr)
This could easily be done with a one-liner, but what it fails to include is the SAN (Subject Alternate name). So we’ll create a small config file to include in our request.
Let’s call it “ssl.cfg”
[req]
distinguished_name = req_distinguished_name
req_extensions = req_ext
prompt = no

[req_distinguished_name]
C = SE
ST = Stockholm
L = Stockholm
O = Rainpole
OU = IT
CN = ipam.sfo.rainpole.io

[req_ext]
subjectAltName = @alt_names

[alt_names]
IP.1 = 172.16.10.7
DNS.1 = ipam.sfo.rainpole.io
Now that we have a configuration file for what we want to include in the .csr, we’ll generate the .csr file.
openssl req -new -key ipam.sfo.rainpole.io.key -out ipam.sfo.rainpole.io.csr -config ssl.cfgNow browse to your Microsoft CAs /certsrv
Select “Request a Certificate”

Select Advanced Certificate Request

in your linux server, cat the .csr file to get it’s content. Copy everything except the “cat” row of the output, including the —- in beginning and end.
cat ipam.sfo.rainpole.io.csr
-----BEGIN CERTIFICATE REQUEST-----
MIIC8TCCAdkCAQAwdDELMAkGA1UEBhMCU0UxEjAQBgNVBAgMCVN0b2NraG9sbTES
MBAGA1UEBwwJU3RvY2tob2xtMREwDwYDVQQKDAhSYWlucG9sZTELMAkGA1UECwwC
SVQxHTAbBgNVBAMMFGlwYW0uYXJuLnJhaW5wb2xlLmlvMIIBIjANBgkqhkiG9w0B
AQEFAAOCAQ8AMIIBCgKCAQEA3Jcv+RiwQ6KIJJTxuf+t8WMbmmpozuEKa/AjbQh9
1GCreXgZQKk+y1U84V56rXBTpbB2r4DKqWWEeK2kHpo+5pUZdVCkmy24fX/vC+bQ
gzCjZGBIZclfZVnM7g6tehulhNXn29c2XylGVw6q7smUPZClK5xtv5zQhVpeCABc
D4qGCKpnWNRfAYO4lujlp8Zot6gy27gaPdFXYuU7P7k+6v/cqKGxbxrLZbvkn198
IS1oAwZX5UGqY2Qm21LUJ4zHaveMJ+Im4xwAn0LMcO5SXyKj2aRHVmMM/Cpldxai
5BkxQgvgj46SpiJbjwpImJSac488OPGaV4CvxA9sM5oeDwIDAQABoDgwNgYJKoZI
hvcNAQkOMSkwJzAlBgNVHREEHjAchwSsEAoHghRpcGFtLmFybi5yYWlucG9sZS5p
bzANBgkqhkiG9w0BAQsFAAOCAQEARi9wauRUOBpgw1MUA5C3aGpeHhZwgwuWdPR+
QtOpvv8EuozwlV/L2+N+vr/CK11RjwKuwXNG2rQW5j1cN+vNvUW8uXXDtpjHsVwI
cEwmYQcd67GG3fHGZ7AxuNGFpLkW7TN/tsSadk96MobpTYspenxo5atYukTj8T5N
eXlRxWABeKoO/aP6/JgsuhImQvt2Ro7Cg9KjkTR76tJLPIZERVDB744r/wiPMvB5
uXpxx1gnBd1WuGdX9UTLGsuw8Fl8DMyGhCrBiRrHA9xoWo7LRzuXzzYmx3iILhKw
At4uy24Erq+NBg73vTq3GqiKAcw8zyb6aEUrysOgMFGAMJRhnQ==
-----END CERTIFICATE REQUEST-----
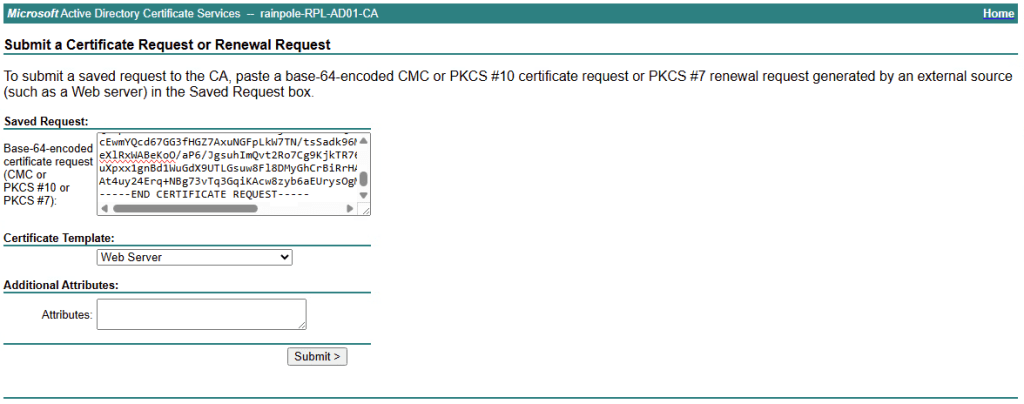
paste this into the base-64-encoded certificate request window.
select Web Server for your Cerficiate Template. And click Submit.
Select Base 64 Encoded, and click Download Certificate, you will be sent a certnew.cer file.

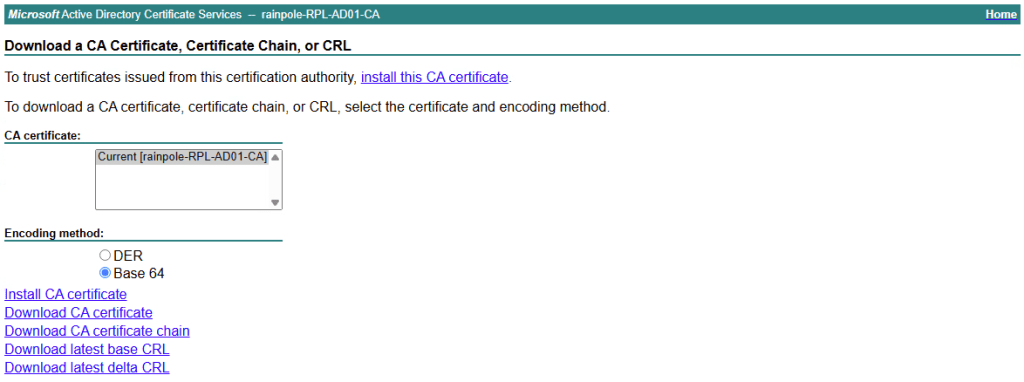
Go back to your /certsrv, this time select Download a CA Certificate

Select Base 64, and “Download CA certificate chain”, it will send you a .p7b file.
Now we’ve got the certificate for the webserver, and the ca with any intermediates. Now we need to scp these to the webserver. Your folder should now look like this.
vmware@ipam:~/certificates$ ls
ipam.sfo.rainpole.io.csr ipam.sfo.rainpole.io.key rpl-ca-chain.p7b
Apache2 wants the certificates in a specific format. So let’s first change the format of the root ca certificate.
openssl pkcs7 -print_certs -in rpl-ca-chain.p7b -out rpl-ca-chain.pemNow let’s change the web servers certificate format
openssl x509 -in ipam.sfo.rainpole.io.cer -outform PEM -out ipam.sfo.rainpole.io.pemNow we can start configuring the webserver with these certificates. We’ll create some directories, set some permissions etc first.
mkdir -p /etc/pki/tls/ca
mkdir -p /etc/pki/tls/certs
mkdir -p /etc/pki/tls/private
cp ~/certificates/ipam.sfo.rainpole.io.key /etc/pki/tls/private
cp ~/certificates/ipam.sfo.rainpole.io.pem /etc/pki/tls/certs
cp ~/certificates/rpl-ca-chain.pem /etc/pki/tls/ca
chmod 400 /etc/pki/tls/private/*
chmod 400 /etc/pki/tls/certs/*
chmod 400 /etc/pki/tls/ca/*
Now let’s configure Apache2, we need to activate ssl.
Original
<VirtualHost *:80>
    ServerAdmin admin@example.com
    DocumentRoot "/var/www/html/phpipam"
    ServerName ipam.sfo.rainpole.io
    ServerAlias ipam.sfo.rainpole.io
    <Directory "/var/www/html/phpipam">
        Options Indexes FollowSymLinks
        AllowOverride All
        Require all granted
    </Directory>
    ErrorLog "/var/log/apache2/phpipam-error_log"
    CustomLog "/var/log/apache2/phpipam-access_log" combined
</VirtualHost>
Modified
<VirtualHost *:443>
    ServerAdmin admin@company.com
    DocumentRoot "/var/www/html/phpipam"
    ServerName ipam.sfo.rainpole.io
    ServerAlias ipam
    SSLCertificateFile      /etc/pki/tls/certs/ipam.sfo.rainpole.io.pem
    SSLCertificateKeyFile   /etc/pki/tls/private/ipam.sfo.rainpole.io.key
    SSLCertificateChainFile /etc/pki/tls/ca/rpl-ca.pem
    <Directory "/var/www/html/phpipam">
        Options Indexes FollowSymLinks
        AllowOverride All
        Require all granted
    </Directory>
    ErrorLog "/var/log/apache2/phpipam-error_log"
    CustomLog "/var/log/apache2/phpipam-access_log" combined
</VirtualHost>
Now check config, and restart Apache2
apache2ctl configtest
systemctl restart apache2
You can now browse to your site, and hopefully it should now be protected with tls 🙂
