NSX microsegmentation will have two parts, one that explains how we can enforce security at a larger scale, and one that explains how we can create segmentation internally within a deployment.
Wide/Infra microsegmentation
When some people hear microsegmentation, they think they need to start by locking down everything at it’s smallest component. That will be time consuming, hard, and tedious.
Since NSX microsegmentation can be implemented in litterally hundreds of ways, it’s best to first start with a thought through plan.
My personal opinion is that you should build layers of dynamic security first, and then focus on the most granular stuff. The dynamic security will be quicker to implement, and affect a larger portion of your estate, thus leading to overall better security.
You can do this by creating zones.
- Development
- Test
- Acceptance
- Production
- DMZ
- etc
You could then start getting more granular by listing application functions.
- Web
- Database
Further, you can then create application specific rules
- webshop
- inventory-management
- hr-system
So back to reality, in the previous Ubuntu and Windows templates, we had the developer/application owner select if the deployment was a Production or Development virtual machine.
Input:
environment:
    type: string
    title: Environment
    oneOf:
      - title: Development
        const: development
      - title: Production
        const: production
resource:
Cloud_vSphere_Machine_1:
    type: Cloud.vSphere.Machine
    properties:
      tags:
        - key: costcenter
          value: ${input.costcenter}
        - key: dtap
          value: ${input.environment}
        - key: backup
          value: ${input.backup}
This means in vSphere the VM will have all 4 of these tags.
But also that these tags are created and assigned in NSX as Security Tags, to the VM.
We can now use these to build nice firewall rules.
When creating firewall rules we want to have the Source and Destination be a Group. So the first thing we need to do is create two dynamic groups.
Login to your NSX manager.
In the top menu, select Inventory, and then in the left menu Groups.
Click Add Group.
Name it production

Now click Set.
Under the Membership Criteria menu, select Add Criterion.
Leave Virtual Machine, Tag, Equals, and production in the first field, and dtap in the second field.
If you’ve already deployed a virtual machine as development, and production, you can browse to them in the drop-down list.
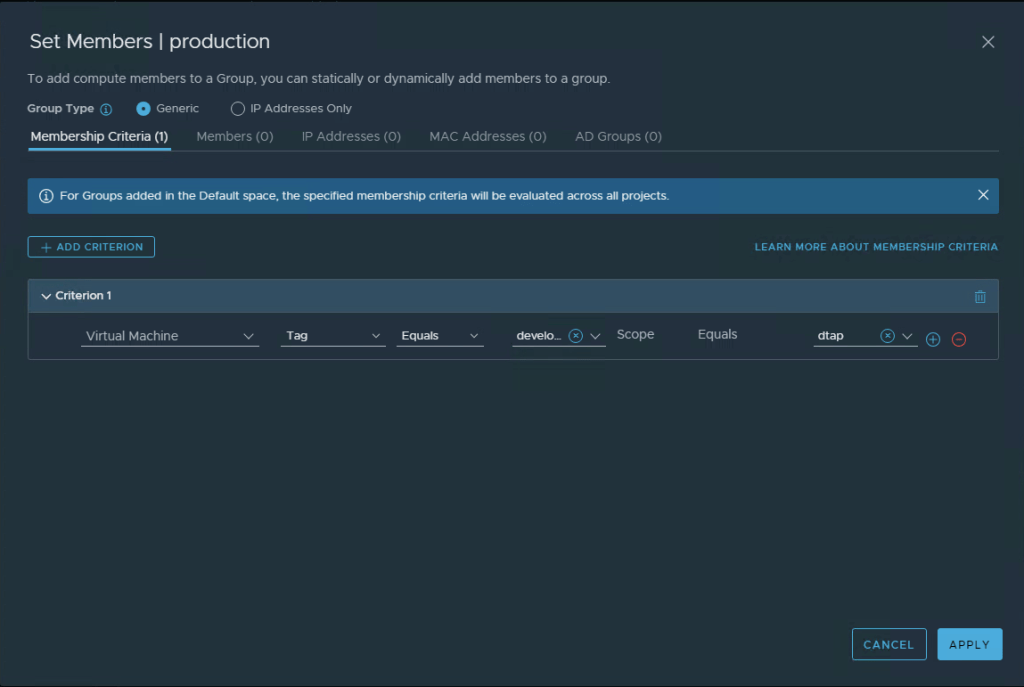
Select Apply, and then Save.
Do the same thing for development.
Finally, we want to add a group for our Active Directory as an example of a common service. In my environment, my ADs are not inside the virtual environment, i will thus add them as IP-Addresses instead. If your ADs are virtual, and within a vCenter connected to NSX i highly recomment adding them to the group as Objects, of either a Virtual Machine Tag, or Name.
Select Add Group.
Name it ad-servers, and select Add Criterion.
Toggle the Group Type to IP Addresses Only, in the field, enter the two ip-addresses for your AD servers. Click Apply, and Save.
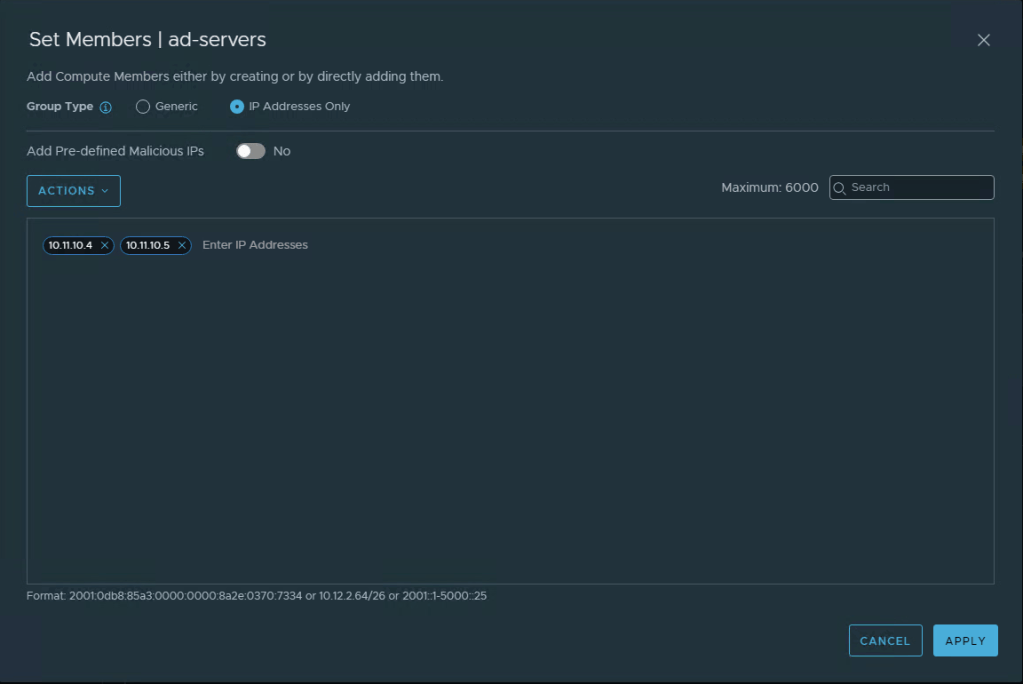
We now have 3 Security Groups, one for production, one for development, and one for ad-servers.
Now in the top menu, select Security, and then in the left menu Distributed Firewall.
We’re going to create rules in each of the Categories Infrastructure, Environment, and Applications. Please see this page for the destinction between the different categories. ( Distributed Firewall Documentation )
The DFW ( Distributed Firewall ) works by going through all the rules from left to right, and top to bottom. So we can make finer and finer rules, ending up in application specific ones under Application.
First let’s start by allowing your VMs to access the ad-servers, with protocols for authentication and DNS.
Select the Category Infrastructure from the section just above the firewall rules list.
Click Add Policy, a new policy is now added to the list below, click the text New Policy and rename it common services, select the 3 verticle dots next to the Policy and click Add Rule.
Name the rule authentication, Hover over the Source field to reveil a pencil, select the pencil.
Check the production and development groups created earlier, and hit Apply.
Hover over Destination, select the pencil, and then select ad-servers, hit Apply.
Now hover over Context Profile, select the pencil.
In the Apply Filter field, type active directory, hit enter, and select the Microsoft Active Directory profile. Hit Apply.
Now, because of how the distributed firewall works, if you leave the choice of Apply To as DFW, it means that even though this rule may not apply to some VMs, it will still be in their firewall list. This causes unncessary cpu load and latency. So we’re going to change this to only be enforced on VMs related to this rule.
Hover over Apply To and select the pencil, check production, development, ad-servers, and hit Apply.
Now click the three verticle dots next to the authentication rule, and select Clone rule.
Rename the rule to dns, and change the context profile by clicking the pencil, de-selecting ACTIVDIR, and instead selecting DNS from the filter.
In the top right, select Publish to make the rules go into effect. Now why did we add two rules? Well, sometimes your AD and DNS arnt on the same VMs. I’m just showing how you could have a Policy with multiple rules in it, with different source/destination and context profiles. And i just find it easier not having too much stuff in one rule.
We have now allowed VMs that belong to production or development to talk to the two ad-servers using authentication protocols, and dns.
Now we want to deny any traffic between production and development. Why? Have you ever had a developer by accident spin up a test-application, configured with the production database instead of the test database, and then screwed up the production data? Thats why…
I think it’s a great way of ensuring that development can only talk to development, production can only talk to production.
Now, change Category to Environment, and select Add Policy, call the Policy production.
Next to the Policy, select the three verticle dots, and Add Rule.
Now i’m going to introduce something called “negated blocking”. Instead of saying “from source” “to destination”, we can say “not from source” “to destination”. In this case we’re going to say “If your not from production” and talking to “production”, then we will block you. So this means if you’re development (which is not production), talking to production, you will be blocked.
name the Rule prod to prod, in the source field select edit, and check production, followed by toggling the negated blocking toggle at the top, click Apply.
In the destination field, select edit, check production, and then Apply.
Leave Service and Context Profiles as Any/None.
Change Applied To, press the radio button to switch to Groups, select production, and change Action to Reject.
Whats the difference between Reject and Block? Well Block will silently just discard the packet, pinging would look like there’s simply nothing on the other side. Reject on the other hand denies the packet and returns this to the client, indicating that the traffic was not allowed. What you choose depends on if you want to be all secret.
Now lets do the exact same thing for development! Don’t forgett to end with pressing Publish.
A picture is worth a thousand words right? So let’s go through this using some pictures.
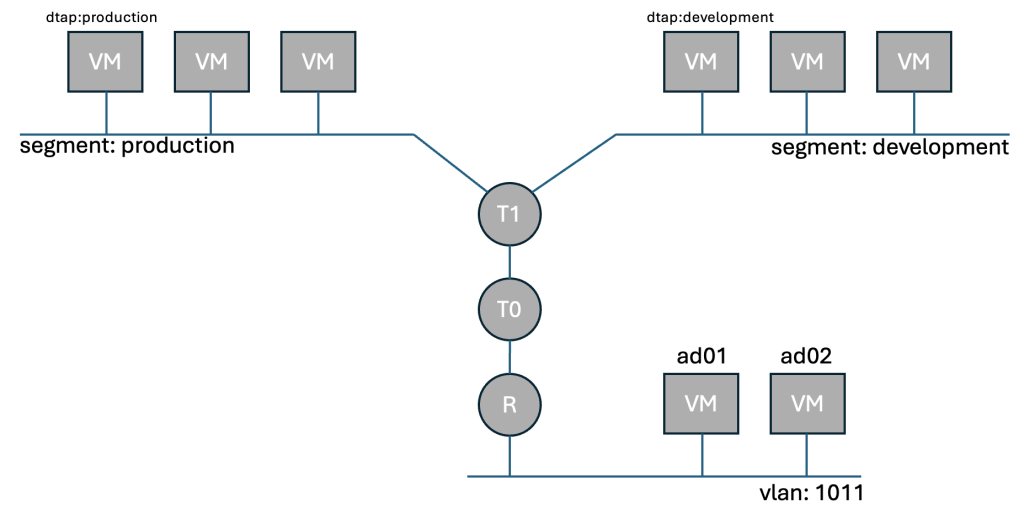
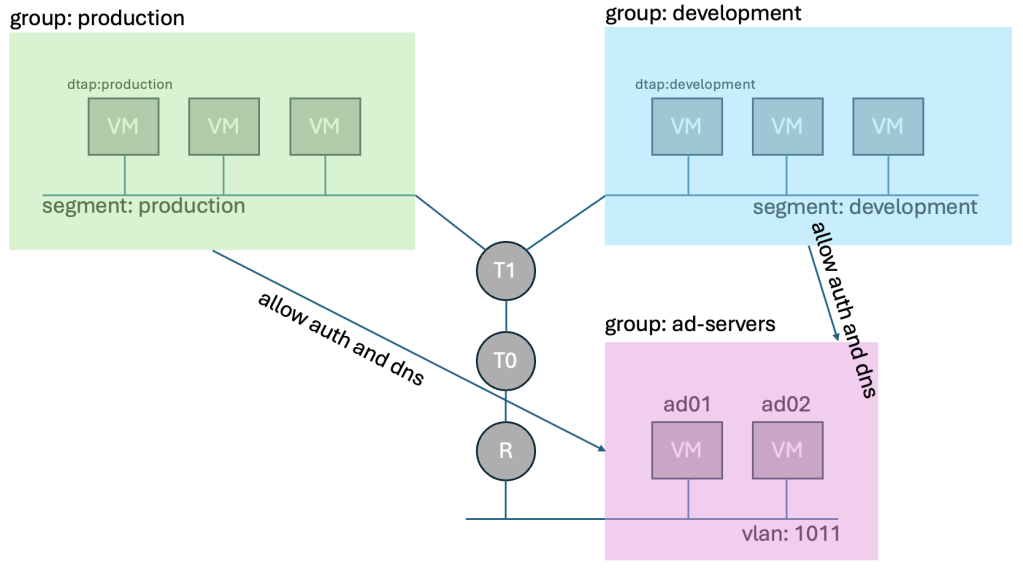
Below we have a illustration showing two NSX segments called production and development.
These are connected to the same T1 router, and without the use of DFW would be able to freely communicate without any restriction.
VCF Automation has applied the security tag dtap:production, and dtap:development to the three VMs on each segment. The tag alone has no enforcement, and does nothing.
We then created two dynamic groups, where we stated that the group has a membership criteria that includes all VMs (current, and future) that have the security tag dtap:production, or dtap:development. We also created a more “static” group called ad-servers with two static ip entries since they are not within control of NSX.
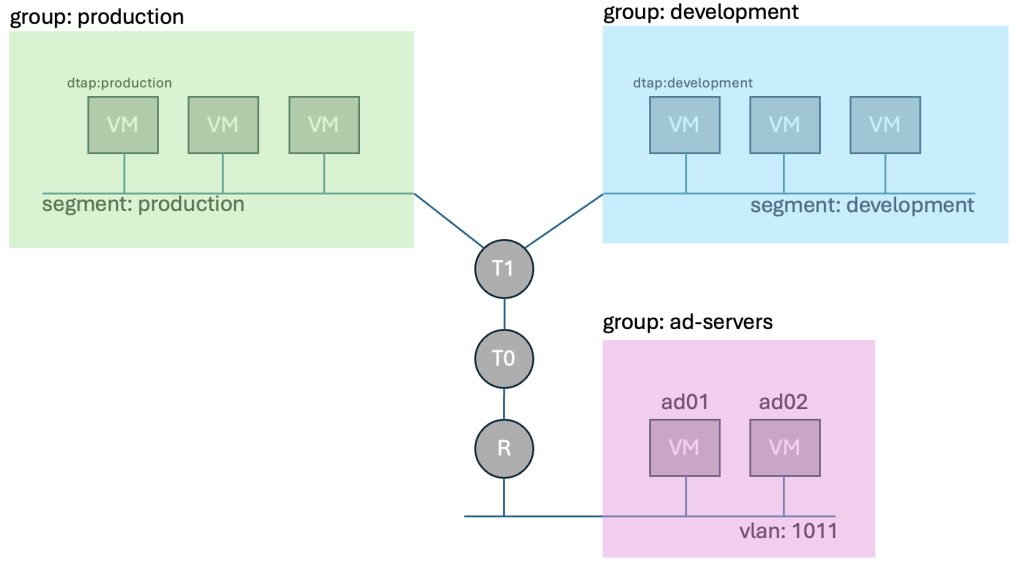
We don’t want production and development to talk to each other, but we do require them to be able to authenticate with AD, and talk to DNS. So we added two rules to the Infrastructure Category. We still havn’t blocked any traffic, only allowed traffic that was so far already allowed between our groups and active directory.
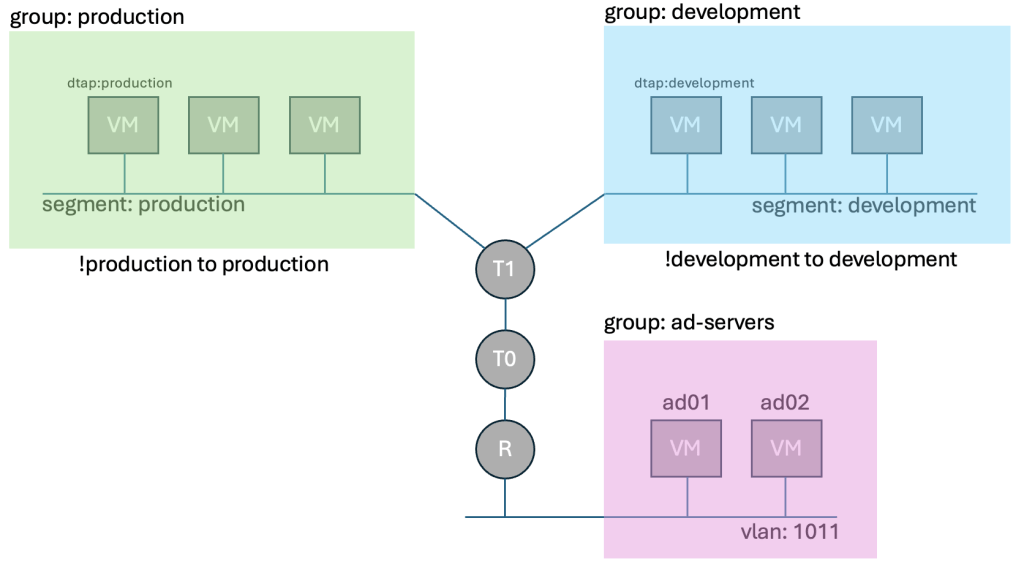
Lastly we created two security policies in the Environment Category that use negated blocking to state, if production is trying to talk to something that is not production, deny it. And if development is trying to talk to something that isn’t development, deny it. You could have created security groups that say production can’t talk to development, and vice versa, but if you have production, development, and test, that would require 6 rules, instead of 3, so it scales poorly.
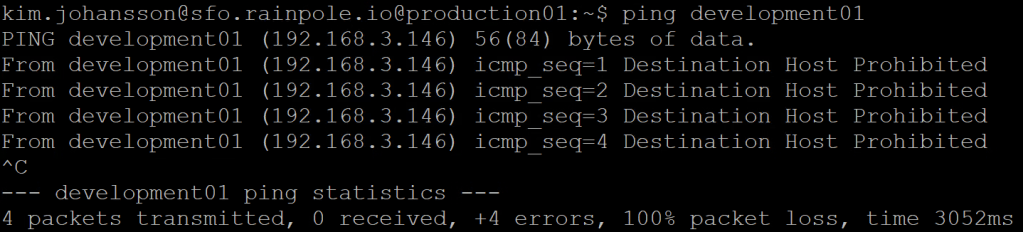
If i now login to one of the three production VMs, and try to ping the development VM, you will see that it is Prohibited, since we selected Reject as the Action.
Further refinements
You’ve now created rules that apply to all VMs, and rules that only affect some VMs to form “zones”. The next step would be to create rules that affect a narrower span. You can be really creative with NSX as a firewall. The source could be an IP-address, a VM with a certain Name, a VM with a certain security tag, an AD Group (Identity Firewall), and could have a time-schedule.
Why would a person who works at a desk in a bank require VDI Access to the loan granting system in the middle of the night?
Create a policy that says SRC=AD_GRP(LoanStaff), DST=NSXGRP(LoanApplication), PROTO=HTTPS, ACTION=Allow, and then set a timepolicy between 08.00-17.00.
Why should VDI’s talk to each other? Most people will login and then access a system from them. VDIs have humans, with minds that are easy to trick using them. It’s a prime candidate for a virus or malware to spread latterally.
Create a Group called VDI with the membership criteria VM Name = vdi-* (would affect VMs called vdi-w11-001)
Then create a security policy that says SRC=VDI, DST=VDI, PROTO=ALL, ACTION=REJECT. Now they can’t talk to each other, but they would be able to access systems you allow them.
In the next part we will go through how to create security within a VCF Automation template.

One thought on “Part 7 – VCF Automation – NSX infra Microsegmentation”