It’s important to remember that VCF Automation does not just create Infrastructure as a Service (IaaS), Platform as a Service (PaaS, the Ubuntu and Windows Templates), but also DaaS (Desktop as a Service), KaaS (Kubernetes as a Service), DBaaS (DataBase as a Service), and lastly XaaS (Anything as a Service). Ehh? Sounds … vague?
Well, since VCF Automation can either hook into other forms of automation, or interract with anything that has some form of capability to be instructed via http-rest, soap, ssh, telnet, etc, we can offer it as a service deliverable. Easily? Well that depends, and i think it’s a fair point to say that if your IPAM is horribly ancient, and provides a terrible API, it may be more economical in the amount of time / upkeep required to just bite the bullet and change the product to something that’s modern and offers integration.
Remember i said that Assembler, and Orchestrator are the Ying and Yang that combine tight integration (Assembler) and extensive integration capability (Orchestrator). To showcase this we’ll go through how to integrate Microsoft Active Directory via Orchestrator, and allow certain users to access these workflows to manipulate AD Users and Groups. But you could just as well write your own Orchestrator workflow to create an end-to-end onboarding or offboarding of a user (username, group memberships, email accounts, pbx entries in SIP appliances, order company credit card, etc) that is triggered by HR.
Base configuration
Of course, you will need to have an Active Directory service account that has the permissions to do user/group manipulation. In this example i’ve created a service account called svc-orch-ad@sfo.rainpole.io following the Validated Solutions examples that one service account is only used between two services, so that if you need to change a service accounts password, you don’t break other stuff.
Login to VCF Automation, and select Orchestrator from the landing page.
Now navigate to Administration and Inventory in the left hand menu.
Select Microsoft Active Directory, as you can see, the integration module has already been installed. You can find more info about the package here: https://marketplace.cloud.vmware.com/services/details/vmware-aria-automation-orchestrator-plug-in-for-microsoft-active-directory but also lots of other integrations. If you can’t find a certain integration on the marketplace, the vendor may be hosting it on their website, or github page.
Select Library and Workflows in the left hand side menu.
In the Filter bar, type active_directory to filter only the flows for Active Directory.
First thing we’re going to do is run the workflow to connect Orchestrator to your AD.
Find the Add an Active Directory Server workflow, and select Run.
Under Connection i’ve used the following variables.
| Configuration Name | sfo.rainpole.io |
| Host | sfo-ad01.sfo.rainpole.io |
| Port | 636 |
| Base | OU=VMUG,DC=SFO,DC=rainpole,DC=io |
| Use SSL | checked |
| Do not ask for confirmation when importing SSL cert | checked |
| Default Domain | sfo.rainpole.io |
Under Authentication i’ve used the following variables.
| Bind Type | Simple |
| Username for Shared Session | svc-orch-ad@sfo.rainpole.io |
| Password for Shared Session | VMw@re1! |
Under Alternative Host i’ve used the following variables.
| Client side Failover | Round-Robin |
| Address | sfo-ad02.sfo.rainpole.io |
Now click Run to execute the workflow.
Hopefully, your workflow will return Completed in a few seconds.
In the left side menu, go back to Administration and Inventory.
Select the Microsoft Active Directory object and expand it, you should now see this.

Now we need to expose the Active Directory workflows that are available in Orchestrator to a Project in Service Broker.
Change view from Orchestrator to ServiceBroker, there’s no “quick menu” option to do this like between Assembler and Service Broker, so the quickest way is to select the 3×3 dots in the upper right hand corner, and select Service Broker.
In the top menu, select Content & Policies, you should now already be in the Content Sources menu. Select New, Orchestrator.
Enter a suiteable name ( I will use VMUG-orchestrator ).
Click Add, to select which workflows you want to expose. I’ve chosen the following.
| Create a user with a password in an organizational unit |
| Create a user group in an organizational unit |
| Change a user password |
| Add a user to a user group |
| Destroy a user |
| Destroy a user group |
| Disable a user |
| Enable a user |
Click Create & Import
Once again we now need to define who we want to share these functions with, on the left hand side under Policies, select Definitions.
You should see your previous content sharing policy created to share Templates, click the policy.
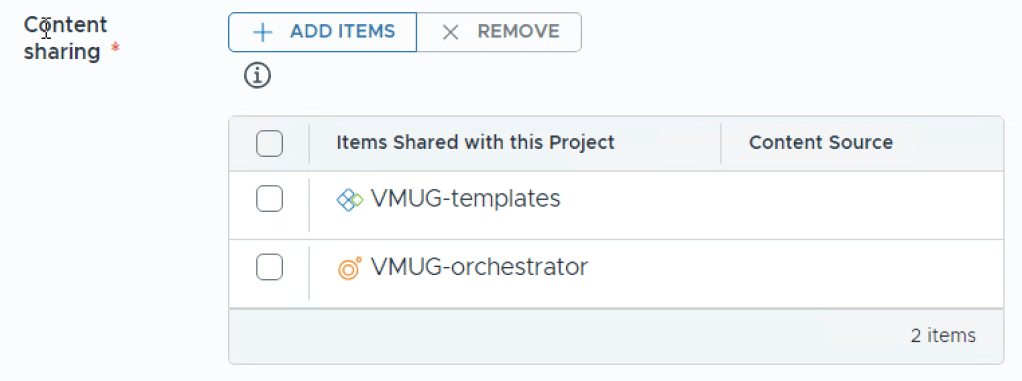
Under Content sharing item, select Add Items.
Select the Orchestrator source, and Add Items.
You should now see both items.
Select Save at the bottom.
Wait 30 seconds, then select Consume in the top menu (it seems to do some background stuff so be patient). You should now see a bunch of Orchestrator workflows available.
Just as with the templates, you can customize these to look prettier. In the top menu, select Content & Policies, then Content.
Select the three dots next to the item you want to modify and either Configure Item to change icon, or Customize Form to create a custom layout.

One thought on “Part 6 – VCF Automation – XaaS Microsoft AD”