Finally! Let’s create a blueprint that we can then publish for consumption.
Login to your Automation portal, Select Assembler and navigate to the Design tab.
We’re going to focus on Three things for now. Templates, Property Groups, and Project Secrets.
Property Groups
Propery groups are objects, that contain static variables that can be useful in Automation Templates. An example may be “WindowsCommon”. In WindowsCommon object we may assign variables such as “domain” = “sfo.rainpole.io”, or “adSvcAccount” = “svc-domain-username”, but not “adJoinPassword” = “SuperSecretPassword”, since that password would then exist in plaintext.
Project Secrets
Navigate to Infrastructure and then Secrets, this is where we would put secret variables that can be called upon from a template, where the actual value should not be visible, a good example is passwords.
Templates
Now if we go back to the Design menu, Templates is the collection of infrastructure and functions that can create advanced deployments, requested by end users or further automation.
Create the Propery Group
First we need to create a property group with the common values that the Linux and Windows Templates will use.
Navigate to Design and Property Group, and click New.
Select Constant Values, and select Change when its pops up.
Name it defaultServerValues.
In the Display Name type Common Server Values.
under Scope select Available for any project.
Select New Property and lets start adding these values
| Name | Type | Value | Hints |
| timezone | string | Europe/Stockholm | For timezones in correct format, see https://en.wikipedia.org/wiki/List_of_tz_database_time_zones |
| domain | string | sfo.rainpole.io | Enter the Domain, or Subdomain that you wish VMs to join, this could be assigned using an input, but if you only have one domain, why ask the user? |
| adSvcAccount | string | svc-domain-join | Your Service Account to join servers to the AD. |
| loginsight | string | sfo-logs01.sfo.rainpole.io | the FQDN to your log insight load balancer. |
Create a Secret
Since we don’t want to enter the password for the AD user in clear text, we will create a Secret.
Navigate to Infrastructure and under Administration section click Secrets.
Select New.
Enter adSvcAccountPassword for the Name.
Choose Organization for the scope.
And enter your password as the Value.
The Ubuntu Template!
To avoid any issues with copy/paste, and maybe get a newer version, or more advanced version, all the templates are available at https://github.com/maxiepax/vcf-automation
Navigate back to the Design menu, and select New From dropdown in the Templates section, Select Blank Canvas.
Name it Linux VM (we can further enhance this template to have Centos, RHEL or other distros in the future, so let’s be generic!).
Select your Project (you always need to specify a project, but templates can later be shared between different projects). If you want to be able to share the project with another project later, select the ratio button Allow an Administrator to share with any project in this org.
Select Create.
You’ll now find a broad selection of capabilities on your left hand side, a canvas in the middle, and Infrastructure as Code (IAC) on the right. Anything you drag’n’drop from the left hand side onto the canvas till be rendered on the cavas, and represented as code in the IAC side. And anything you type as code in the IAC side, will be rendered in the canvas, pretty sweet!
This means you can now copy/paste this code into the IAC plane (Just replace everything in the IAC side)
formatVersion: 1
inputs:
  hostname:
    type: string
    title: Hostname
    description: The hostname of the virtual machine
  osversion:
    type: string
    title: Linux Version
    description: Choose what version of windows
    oneOf:
      - title: Ubuntu 20.04 Cloud LTS
        const: linux-ubuntu-server-20.04
      - title: Ubuntu 22.04 Cloud LTS
        const: linux-ubuntu-server-22.04
      - title: Ubuntu 24.04 Cloud LTS
        const: linux-ubuntu-server-24.04
    default: linux-ubuntu-server-24.04
  size:
    type: string
    title: VM Size
    description: |-
      <b> Select the size of deployment </b></br>
      Small: 1 vCPU - 2GB ram - 40GB disk </br>
      Medium: 2 vCPU - 4GB ram - 40GB disk </br>
      Large: 4 vCPU - 16GB ram - 40GB disk </br>
    enum:
      - small
      - medium
      - large
      - xlarge
    default: medium
  environment:
    type: string
    title: Environment
    oneOf:
      - title: Development
        const: development
      - title: Production
        const: production
  costcenter:
    type: integer
    title: Cost Center
    minLength: 5
    maxLength: 5
  backup:
    type: string
    title: Backup
    default: 24h31d
    oneOf:
      - title: 12 hours, 31 day retention
        const: 12h31d
      - title: 24 hours, 31 day retention
        const: 24h31d
      - title: none
        const: declined
  ad_group:
    type: string
    title: AD Groups
    description: Provide the Group of people to be permitted login to server in format group@domain.com
    default: ""
  superuser_ad_group:
    type: string
    title: Superuser AD Groups
    description: Provide the Group of people to have superuser priviliges in format group@domain.com
    default: ""
resources:
  Network:
    type: Cloud.vSphere.Network
    properties:
      networkType: existing
      constraints:
        - tag: env:${input.environment}
  Cloud_vSphere_Machine_1:
    type: Cloud.vSphere.Machine
    properties:
      tags:
        - key: costcenter
          value: ${input.costcenter}
        - key: dtap
          value: ${input.environment}
        - key: backup
          value: ${input.backup}
      image: ${input.osversion}
      flavor: ${input.size}
      networks:
        - network: ${resource.Network.id}
          securityGroups: []
      cloudConfig: |
        #cloud-config
        hostname: ${input.hostname}
        fqdn: ${input.hostname}.sfo.rainpole.io
        timezone: ${propgroup.defaultServerValues.timezone}
        disable_root: true
        ssh_pwauth: yes
        users:
          - default
          - name: root
            passwd: $6$pCNgiQprrT/EmeE5$zuE5ZtTJfoLXr5BK34SuaH4FSDAIgRykN5xq89lF0VTw8kMErBhPdaDsvHwsLH/3E3K0jIjG7ob17pZXKdhw70
            lock_passwd: false
            shell: /bin/bash
          - name: vmware
            gecos: vmware
            lock_passwd: false
            groups: sudo, users, admin
            shell: /bin/bash
            sudo: ALL=(ALL) NOPASSWD:ALL
            passwd: $6$pCNgiQprrT/EmeE5$zuE5ZtTJfoLXr5BK34SuaH4FSDAIgRykN5xq89lF0VTw8kMErBhPdaDsvHwsLH/3E3K0jIjG7ob17pZXKdhw70
        package_upgrade: true
        package_update: true
        package_reboot_if_required: true
        packages:
          - sssd-ad
          - sssd-tools
          - realmd
          - adcli
        runcmd:
        - sudo realm -v discover ${propgroup.defaultServerValues.domain}
        - echo ${secret.adSvcAccountPassword} | sudo realm join -U ${propgroup.defaultServerValues.adSvcAccount} ${propgroup.defaultServerValues.domain}
        - sudo realm deny --all
        - sudo realm permit -g ${input.ad_group}
        - echo '%${input.superuser_ad_group}@${propgroup.defaultServerValues.domain}  ALL=(ALL:ALL) ALL' >> /etc/sudoers
        - sudo pam-auth-update --enable mkhomedir
        - wget https://${propgroup.defaultServerValues.loginsight}/api/v1/agent/packages/types/deb --no-check-certificate -O /tmp/liagent-current.deb --quiet
        - SERVERHOST=${propgroup.defaultServerValues.loginsight} SERVERPROTO=cfapi SERVERPORT=9000 LIAGENT_AUTOUPDATE=yes LIAGENT_SSL=no dpkg -i /tmp/liagent-current.deb > /dev/null 2>&1
        - sudo userdel -r ubuntu
        power_state:
          delay: now
          mode: reboot
          message: Rebooting the OS
          condition: if [ -e /var/run/reboot-required ]; then exit 0; else exit 1; fi
Now this is a quite long blueprint, so i’m going to break down the different bits below. Please note these are excerptions of the code above, you don’t need to add these (again).
First we have the formatVersion, which just describes the version of VCF automation syntax that will follow, we are currently at major version 1.
Inputs
Next we have inputs, this section determines what selectables should be presented to the user. This should ideally be zero! If you spend 10 hours in your code reducing the amount of answers that 1000 users need to spend 1h each trying to figure out, you’ve saved your company 990 hours. I think this is the most critical part of automation!
– Quality that is produced from using automation for repetitive tasks.
– Amount of hours saved by offloading the masses, by spending a few hours to optimize things.
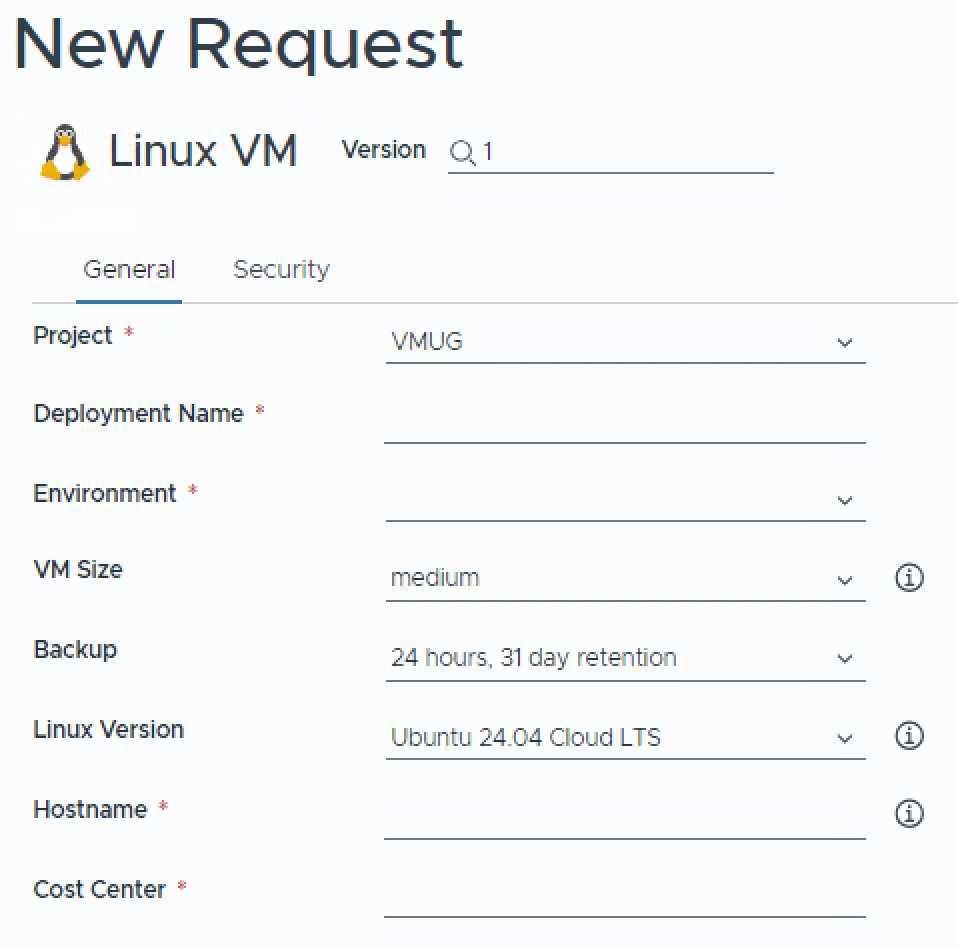
Please think long and hard, before asking a user to input something! This example Template has lots of options simply to demonstrate what you COULD require a user to answer! I’ll include a picture of a rendering of what the user would see when deploying the blueprint.
formatVersion: 1
inputs: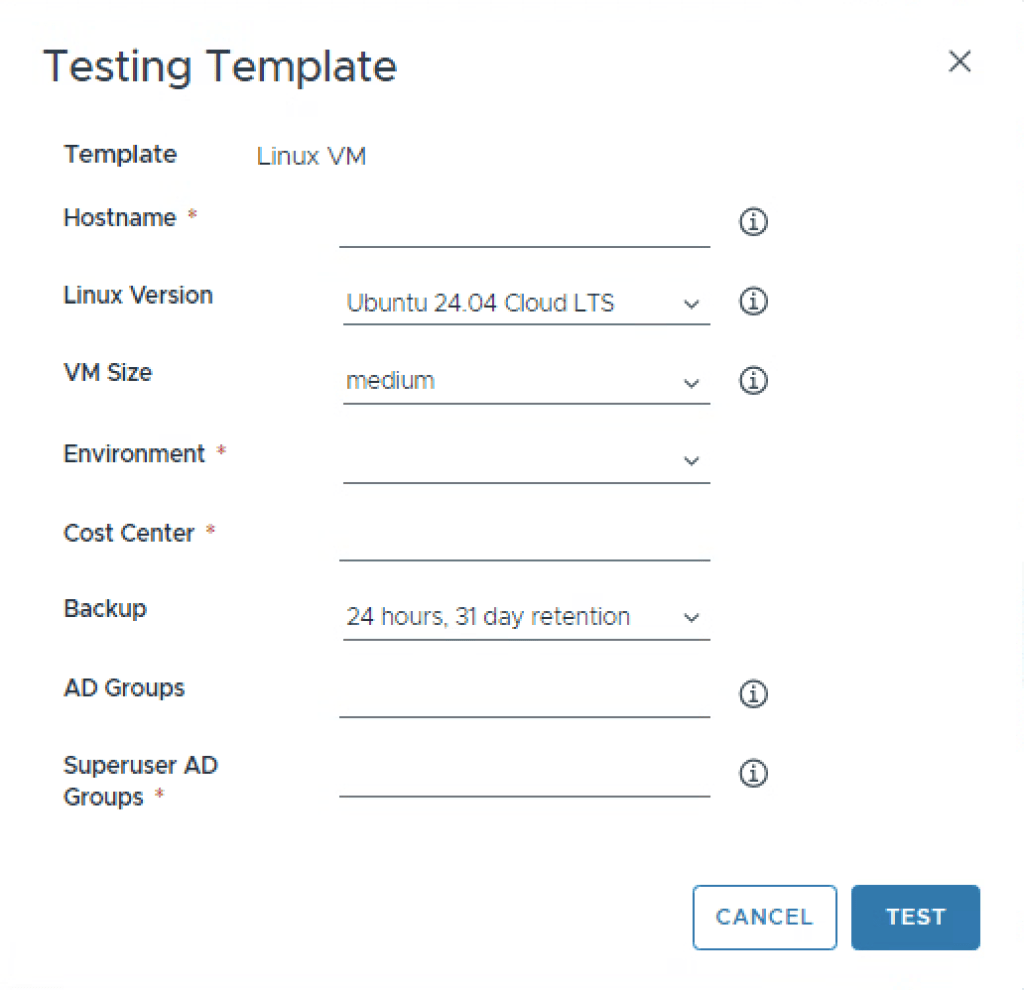
First inputs are hostname and osversion.
hostname states that it expects the user to input a string, and then offers a title and a description. The title is the text that is printed before the input, and should be short. The description is the text presented if you click the information icon.
osversion is the second input, again we’re expecting a string, but the string will come from selecting “oneOf”. This will be rendered as a dropdown with a single choice.
a oneOf will have however many options you choose, with a title, and a constant (const).
The title can look “pretty”, like Ubuntu 24.04 Cloud LTS, which is not a string you would want to use as a variable in code. What will actually be stored in the varible is the const (constant) linux-ubuntu-server-24.04.
This is the reason we named the Image mappings the way we did!
It’s nice to also include a default, otherwise the dropdown will look “empty” on first presentation, and if the users happy with the version, its one less input they need to modify to their liking. Illustration below for what the dropdown actually looks like.
hostname:
    type: string
    title: Hostname
    description: The hostname of the virtual machine
  osversion:
    type: string
    title: Linux Version
    description: Choose what version of windows
    oneOf:
      - title: Ubuntu 20.04 Cloud LTS
        const: linux-ubuntu-server-20.04
      - title: Ubuntu 22.04 Cloud LTS
        const: linux-ubuntu-server-22.04
      - title: Ubuntu 24.04 Cloud LTS
        const: linux-ubuntu-server-24.04
    default: linux-ubuntu-server-24.04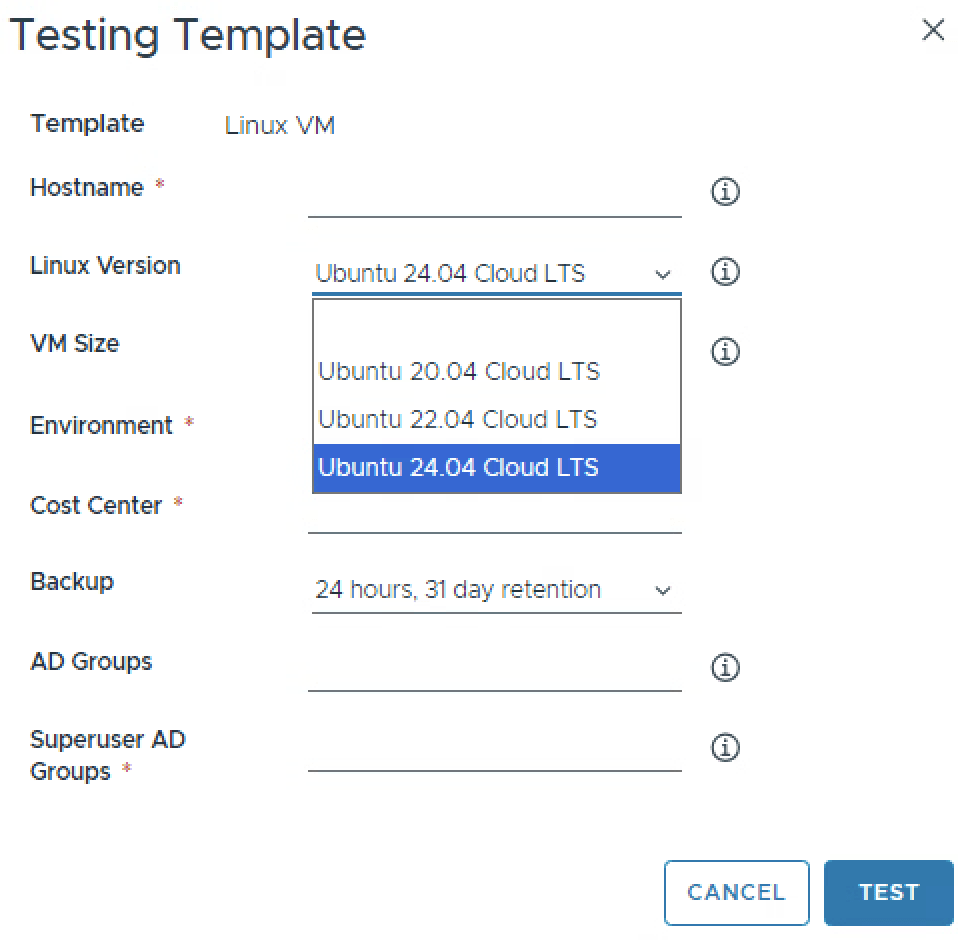
Next is size and environment. It’s fully possible to allow the user to choose freely with cpu, memory, disk configurations. But most companies prefer that you stick to some defaults if possible. This is why we created the Flavor mappings!
Again we are expecting to recieve a string variable, which the enum will populate.
We have a short descriptive title, and a longer description. The |- indicates that you want to input a multiline piece of text, as you can see it’s even HTML formated to look a bit prettier.
Now whats the difference between a oneOf and enum? Look pretty similar?
oneOf allows you to input a “key” “variable” style of input where you have a “pretty” key, and a machine-readable variable.
enum, the key and variable are the same, and since we don’t really need to make it more complex then allowing the user to choose between small, medium, large, we can use enum.
If you would like to have the text say small vm, then you would have to use oneOf to have small vm as the title, and small as the const.
again, a default so that it’s visible without clicking the dropdown.
next the environment input asks for a string, with a short title, and a oneOf as input. This will later be used to allow the automation to choose e.g what network to attatch to.
size:
    type: string
    title: VM Size
    description: |-
      <b> Select the size of deployment </b></br>
      Small: 1 vCPU - 2GB ram - 40GB disk </br>
      Medium: 2 vCPU - 4GB ram - 40GB disk </br>
      Large: 4 vCPU - 16GB ram - 40GB disk </br>
    enum:
      - small
      - medium
      - large
      - xlarge
    default: medium
  environment:
    type: string
    title: Environment
    oneOf:
      - title: Development
        const: development
      - title: Production
        const: production
Next is the costcenter and backup. Ideally we wouldn’t need to use costcenter, but it’s usually top of mind for C-level to ensure that each division in a company pays for it’s fair share. It’s important to note that Cloud Foundation as a platform does not include a billing system, but we can provide you with the capabilities of displaying to a user what something will cost the project, and the ability to tag deployments with tags that can be used with automation to provide your chargeback system with the required inputs!
costcenter here is a type integer (a number), with a short title, and for demonstration i’ve required a minimum length of 5, and a maximum length of 5. In other words, i expect the user to input something similar to 12345, or 12129.
backup is a “hack” that will work for mostly any backup vendor out there. This will simply add a vSphere tag to the VM, that the backup vendor can scan for. Most backup vendors out there will have integration for VCF Automation (search for the old names vRealize Automation, or Aria Automation) in form of VMware Orchestrator workflows, or ABX extensions, that will allow much more granular options, and day2 actions such as recovering files, or entire VMs by the user itself. Again, this is for demonstration purpose, and will work with 99% of all backup vendors.
We expect a type string, a short title, a default value, and a oneOf that gives the user a few options, where one is to declined.
This will result in a vSphere tag being applied to the VM later in form of backup:24h31d which would as an example,mean a backup every 24h, saved for 31d.
costcenter:
    type: integer
    title: Cost Center
    minLength: 5
    maxLength: 5
  backup:
    type: string
    title: Backup
    default: 24h31d
    oneOf:
      - title: 12 hours, 31 day retention
        const: 12h31d
      - title: 24 hours, 31 day retention
        const: 24h31d
      - title: none
        const: declined
Lastly, we have the inputs ad_group and superuser_ad_group.
Both of these expect a string as type, with a short title, a description and default of .. well nothing. These will later be used in the deployment template to determine what AD group can login to the linux VM, and what group will have administrative priviliges.
ad_group:
    type: string
    title: AD Groups
    description: Provide the Group of people to be permitted login to server in format group@domain.com
    default: ''
superuser_ad_group:
    type: string
    title: Superuser AD Groups
    description: Provide the Group of people to have superuser priviliges in format group@domain.com
    default: ''
Resources
Resources are what is “output” when deploying the Template. This can be Virtual machines, Networks, Load balancers, extra Disks, Security policies, or Object storage.
First we’re going to determine that there will be a network. This will be speficially of the type Cloud.vSphere.Network, so a PortGroup or Segment.
We can now assign this network properties, where the first one is networkType. A network can be existing, or created as a on-demand network where you can choose what name it should have be maybe a combination of the environment input, and deployment name?
Constraints is used for the first time. A constraint is basically telling the automation system “You can deploy to any network you want that has the following tag assigned”.
In this case if the user had chosen “development” in the dropdown for environment, and i had assigned the tag “env:development” to the network profile for “development”, then the automation would choose this network profile over the network profile “production” since it only has a “env:production” tag assigned to it.
So having no constraint tags will instruct the automation engine to with “whatever it finds first” thats suitable. And adding a constraint will ensure compliance by placing the workload in a suitable location.
inspecting the “tag” we can see that for the first time we are referencing the variable input in the form of env:${input.environment}, so this is the input environment declared in the beginning, which was a string. if the user chose development, this would be translated to
– tag: env:development
Network:
    type: Cloud.vSphere.Network
    properties:
      networkType: existing
      constraints:
        - tag: env:${input.environment}
Next we have the actual virtual machine, we can see that this is specifically a Cloud_vSphere_Machine, with _1 appended. This means it will be required to be a vSphere VM, and not a Azure VM. You can use the type “Cloud.Machine” to make it agnostic and be able to deploy to e.g Azure also. _1 is appended since a Template can have hundreds of VMs in it if it’s a complex deployment.
In the properties section we will add a number of things.
tags are vSphere tags or nsx Security tags.
I will cover NSX Security tags in a later part of the series, for now we will focus on vSphere tags.
After deployment the VM will have the vSphere tags assigned from the inputs costcenter, dtap (Development, Test, Acceptence, Production), and backup. (e.g. costcenter:12345 , dtap:production , backup:declined)
image detemines what Image Mapping to use, and will be the input from the oneOf of the input image.
Same with flavor, here the enum of the input size will be used.
Since we declared that a network will be used, we also want to ensure this VM gets connected to said network. under networks we then assign the network variable to the resource previously created by referencing it’s name “Network”, and it’s .id
securityGroups is left blank, we will get into how security groups, and security tags are used later in this series.
Last is cloudConfig | , which since its VERY long, i will now get into. This is however ONE very, very long variable that is passed to the VM as a file in a .ISO image, and is then executed in the operatingsystem ONCE during initial setup.
 Cloud_vSphere_Machine_1:
    type: Cloud.vSphere.Machine
    properties:
      tags:
        - key: costcenter
          value: ${input.costcenter}
        - key: dtap
          value: ${input.environment}
        - key: backup
          value: ${input.backup}
      image: ${input.osversion}
      flavor: ${input.size}
      networks:
        - network: ${resource.Network.id}
          securityGroups: []
      cloudConfig: |
CloudConfig, you will learn to love and hate it. The documentation is rich, but the examples are not always what you’re looking for, and it can be really tricky to troubleshoot what’s actually not working. As always, search for other peoples code to copy/paste the bits that suite you will save you lots of time. The whole point with CloudConfig is to get your VM to a point in where it’s usable enough to continue with further automation to customize it to perform it’s duties.
For me, this means things like hostname, syslog, base packages, authentication and priviliges.
Indentation in both VCF Automation, and cloudConfig is key! This is the first thing you should check when something is not working! The syntax of Linux and Windows cloudConfig is not the same!
I’m going to break this down the same way as above in smaller bits and pieces.
#cloud-config
        hostname: ${input.hostname}
        fqdn: ${input.hostname}.sfo.rainpole.io
        timezone: ${propgroup.defaultServerValues.timezone}
        disable_root: true
        ssh_pwauth: yes
        users:
          - default
          - name: root
            passwd: $6$pCNgiQprrT/EmeE5$zuE5ZtTJfoLXr5BK34SuaH4FSDAIgRykN5xq89lF0VTw8kMErBhPdaDsvHwsLH/3E3K0jIjG7ob17pZXKdhw70
            lock_passwd: false
            shell: /bin/bash
          - name: vmware
            gecos: vmware
            lock_passwd: false
            groups: sudo, users, admin
            shell: /bin/bash
            sudo: ALL=(ALL) NOPASSWD:ALL
            passwd: $6$pCNgiQprrT/EmeE5$zuE5ZtTJfoLXr5BK34SuaH4FSDAIgRykN5xq89lF0VTw8kMErBhPdaDsvHwsLH/3E3K0jIjG7ob17pZXKdhw70
        package_upgrade: true
        package_update: true
        package_reboot_if_required: true
        packages:
          - sssd-ad
          - sssd-tools
          - realmd
          - adcli
        runcmd:
        - sudo realm -v discover ${propgroup.defaultServerValues.domain}
        - echo ${secret.adSvcAccountPassword} | sudo realm join -U ${propgroup.defaultServerValues.adSvcAccount} ${propgroup.defaultServerValues.domain}
        - sudo realm deny --all
        - sudo realm permit -g ${input.ad_group}
        - echo '%${input.superuser_ad_group}@${propgroup.defaultServerValues.domain}  ALL=(ALL:ALL) ALL' >> /etc/sudoers
        - sudo pam-auth-update --enable mkhomedir
        - wget https://${propgroup.defaultServerValues.loginsight}/api/v1/agent/packages/types/deb --no-check-certificate -O /tmp/liagent-current.deb --quiet
        - SERVERHOST=${propgroup.defaultServerValues.loginsight} SERVERPROTO=cfapi SERVERPORT=9000 LIAGENT_AUTOUPDATE=yes LIAGENT_SSL=no dpkg -i /tmp/liagent-current.deb > /dev/null 2>&1
        - sudo userdel -r ubuntu
        power_state:
          delay: now
          mode: reboot
          message: Rebooting the OS
          condition: if [ -e /var/run/reboot-required ]; then exit 0; else exit 1; fi
Linux cloudConfig will always begin with #cloud-config, so that the parsing function knows what syntax to expect.
Next we have hostname, which will grab your input.hostname string, and set as the hostname of the VM. Regardless if this is Ubuntu, CentOS, RHEL, or Photon. Cloud-config has made this agnostic.
timezone will configure the timezone of the VM to what was defined in the propertgroup.
disable_root will simply disable the root account, since it’s security best practice to use a named user account for traceability.
ssh_pwauth will allow users to login using ssh.
users section will configure, and create users.
for the root user we change the password with a predefined hash, this hash is equivilient to VMw@re1!, you can read how to create a new hash here: https://linuxconfig.org/how-to-hash-passwords-on-linux
We then set the password to not be locked for password login, and the default shell.
Next we add a user called vmware, set the “human name” gecos also to vmware, allow user to login via password, add the user to the groups sudo, users, and admin. Set the shell to bash, and change so that the user does not require to enter a password for sudo commands (dangerous, just as an example). Lastly we set the users password to the same VMw@re1! password.
Ideally, one would ask the user for a ssh-key, which is added by cloudConfig for user login.
#cloud-config
        hostname: ${input.hostname}
        fqdn: ${input.hostname}.sfo.rainpole.io
        timezone: ${propgroup.defaultServerValues.timezone}
        disable_root: true
        ssh_pwauth: yes
        users:
          - default
          - name: root
            passwd: $6$pCNgiQprrT/EmeE5$zuE5ZtTJfoLXr5BK34SuaH4FSDAIgRykN5xq89lF0VTw8kMErBhPdaDsvHwsLH/3E3K0jIjG7ob17pZXKdhw70
            lock_passwd: false
            shell: /bin/bash
          - name: vmware
            gecos: vmware
            lock_passwd: false
            groups: sudo, users, admin
            shell: /bin/bash
            sudo: ALL=(ALL) NOPASSWD:ALL
            passwd: $6$pCNgiQprrT/EmeE5$zuE5ZtTJfoLXr5BK34SuaH4FSDAIgRykN5xq89lF0VTw8kMErBhPdaDsvHwsLH/3E3K0jIjG7ob17pZXKdhw70
Next is adding configuring software repo, and adding software packages.
package_update will run the equivilient of apt-get update.
package_upgrade will run the equivilent of apt-get upgrade.
package_reboot_if_required is pretty self explanetory. If the package requires a reboot (maybe a kernel), it’s ok to reboot.
packages defines that software packages will be downloaded. Here i’ve defined the packages required to join a Microsoft Active Directory, that we will use later.
        package_upgrade: true
        package_update: true
        package_reboot_if_required: true
        packages:
          - sssd-ad
          - sssd-tools
          - realmd
          - adcli
Now for the final touches. runcmd will do just that, it will execute the commands one after the other.
realm -v discover will using the property group value domain to discover the configuration/capabilities of your Active Directory, it does this using SRV records in your DNS.
We then echo the password in the secret created, and pipe/inject that into realm to join the active directory domain.
We then deny all users from logging in via domain (local users still work).
And then allow the group we provided in the input.
Followed by adding the sudo group to the sudoers list.
pam-auth-update –enabled mkhomedir ensures that when a AD user logs in, a /home/ directory is created for them.
We then download the Loginsight agent from your loginsight cluster, install it, and configure it to send your logs to the loginsight syslog cluster.
Finally we delete the “default” user Ubuntu, even though it doesn’t have a homdir or password, it’s not needed after cloud-init is done.
runcmd:
        - sudo realm -v discover ${propgroup.defaultServerValues.domain}
        - echo ${secret.adSvcAccountPassword} | sudo realm join -U ${propgroup.defaultServerValues.adSvcAccount} ${propgroup.defaultServerValues.domain}
        - sudo realm deny --all
        - sudo realm permit -g ${input.ad_group}
        - echo '%${input.superuser_ad_group}@${propgroup.defaultServerValues.domain}  ALL=(ALL:ALL) ALL' >> /etc/sudoers
        - sudo pam-auth-update --enable mkhomedir
        - wget https://${propgroup.defaultServerValues.loginsight}/api/v1/agent/packages/types/deb --no-check-certificate -O /tmp/liagent-current.deb --quiet
        - SERVERHOST=${propgroup.defaultServerValues.loginsight} SERVERPROTO=cfapi SERVERPORT=9000 LIAGENT_AUTOUPDATE=yes LIAGENT_SSL=no dpkg -i /tmp/liagent-current.deb > /dev/null 2>&1
        - sudo userdel -r ubuntu
        power_state:
          delay: now
          mode: reboot
          message: Rebooting the OS
          condition: if [ -e /var/run/reboot-required ]; then exit 0; else exit 1; fi
Summary
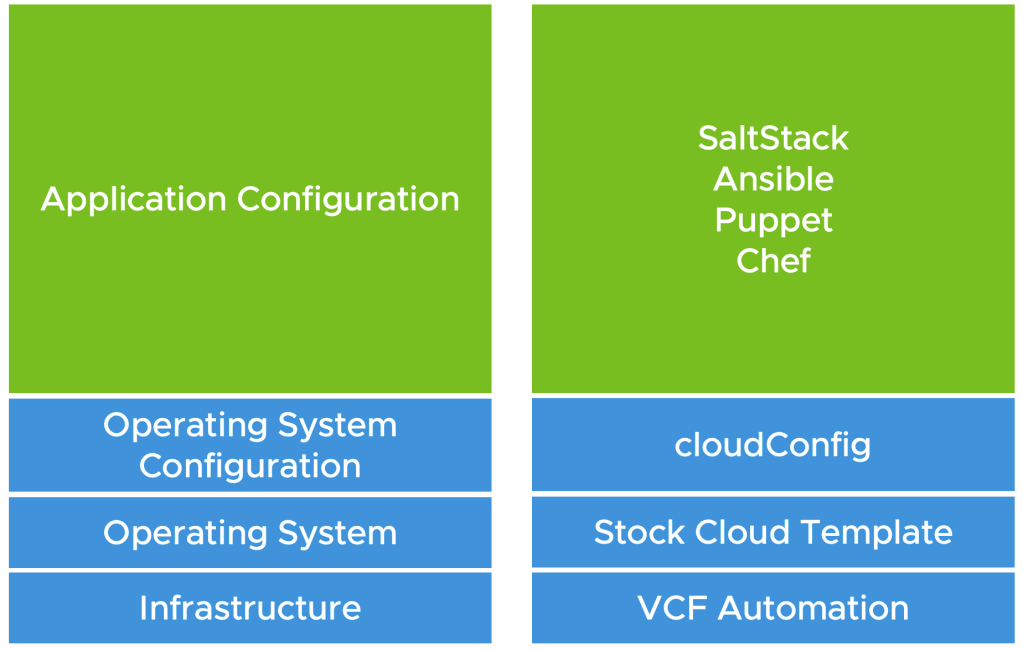
Well, that was a lot. But hopefully you understand what each thing now does. In essence, we’ve dictated what we want as inputs to deploy a system without doing anything manually. Deployed a “vanilla” Ubuntu machine from a .ova template downloaded online. And then customized the guest operating system enough to ensure that it’s updated, secure, and is doing housekeeping things such as sending logging to a central location, and it’s now ready to be further customized to perform it’s duties as an application server. I’ve illustrated the roles and responsibilities in the below image.
Deploy!
We now want to test the deployment to see that it works as expected before allowing someone to actually consume it via the self-service portal.
In the lower left hand corner, press Deploy, and fill in the values you want. You will automatically be redirected to the Resources menu, and Deployments, where you can now observe the deployment process of VCF Automation creating the infrastructure, the virtual machine, and assigning all the tags etc. In a few moments when the deployment is done you will be able to see the Address of your virtual machine, go ahead and SSH it and see you can login with the username.
If everything is to your liking, we can now go ahead and release this blueprint to users. Go back to Design and click your template. Click Version, give it a version ( 0.1, 1, it’s up to you), write a description and a changelog, check the Release this version to the catalog, and then create.
Creating a Content Source
So even though you’ve published a Template, in Service Broker you need to subscribe to different content sources, why’s that? Well, Templates are just one thing that you can consume in VCF Automation. Creating a AD User in an AD Group does not involve Assembler, but rather a Orchestrator workflow. So we’re going to quickly subscribe to a Template cataloge.
In the top menu, select Content & Policies, you should now automatically be in the Content Sources menu on the left. Click New, and then hit the Automation icon.
For the name, enter the project name followed by templates. (eg. VMUG-templates).
Click the Source Project dropdown, and select your project.
Click Validate, it should now say it’s found one Template.
Now select Create & Import.
Creating a Sharing Policy
Now the final step is to create a Sharing Policy.
In Content & Policies, click Definitions under the Policies submenu.
Select New Policy, and Content Sharing Policy.
Name it Project Sharing Policy (e.g VMUG Sharing Policy), Set the scope to Project, and select your Project.
Click Add Items, and select your content source, click Add Items.
Select User Based and check Share content with all users/groups in the project.
Click Create.
Catalog
Now finally, the moment we’ve all been waiting for, Select Catalog on the left menu, and you should now see your Linux VM template! Hit Request and create your first deployment!

Making it look pretty!
You may notice that your inputs are in somewhat wierd order, we can fix that.
In the top menu select Content & Policies, and then Content.
Click the three verticle dots next to the Linux VM template, and choose configure Item.
This will allow you to replace the default icon, since it’s a linux machine we can replace it with Tux. I’ll use this one https://icons.iconarchive.com/icons/papirus-team/papirus-apps/512/tux-icon.png
Now click the three verticle dots again but select Customize form.
You can now re-arrange the inputs by drag’n’dropping them.
As you may notice it’s also possible to do very advanced stuff like hiding inputs, or making them depend on each other. For now, just to get a basic understanding of how this works, highlight AD Groups, and select the three verticle dots that appear to the right, select Delete Section. Do this also for the Superuser AD Group. They will now become visible in the left window called Request Inputs.
(If you are left with an “Empty Section”, this means you clicked the actual input, each input is contained within a Section. If you instead highlight the section by pressing to the right of the actual input, you can delete both in one swoop.)
Re-arrange the rest as you would like them.
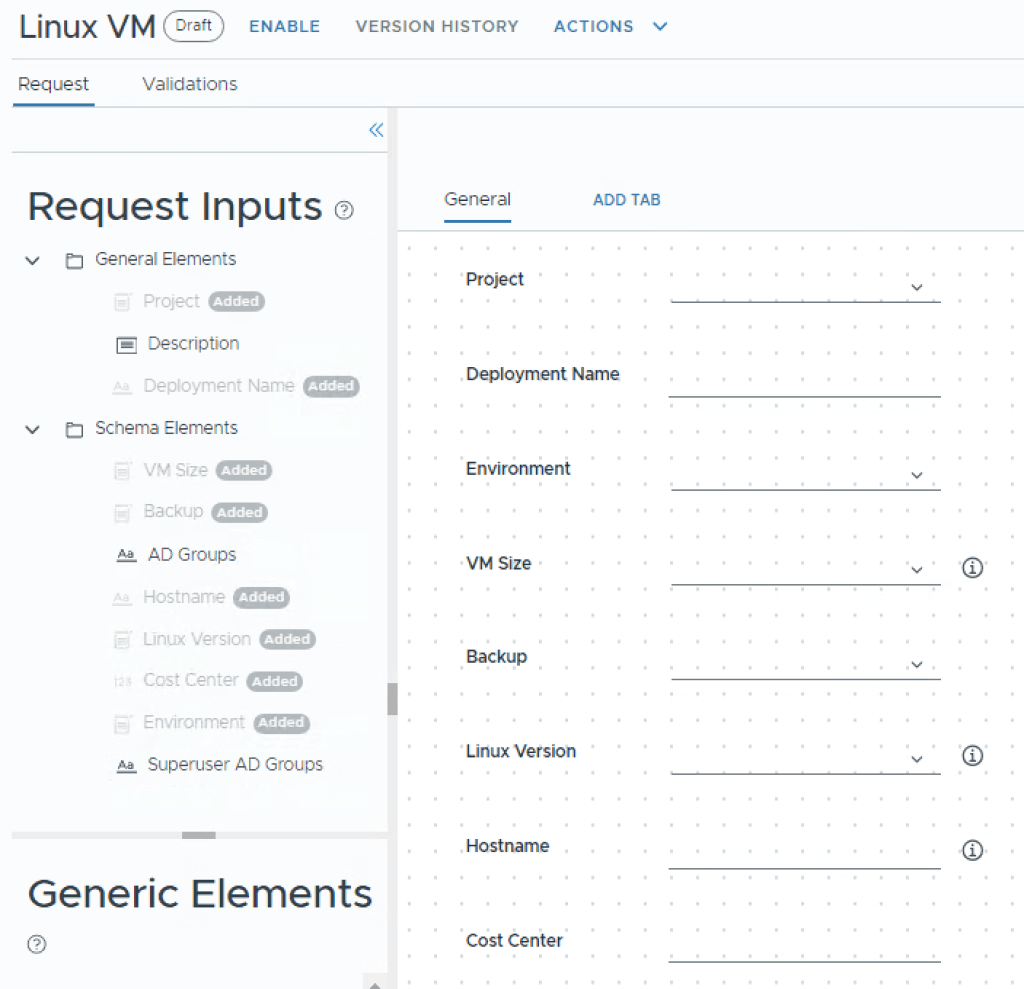
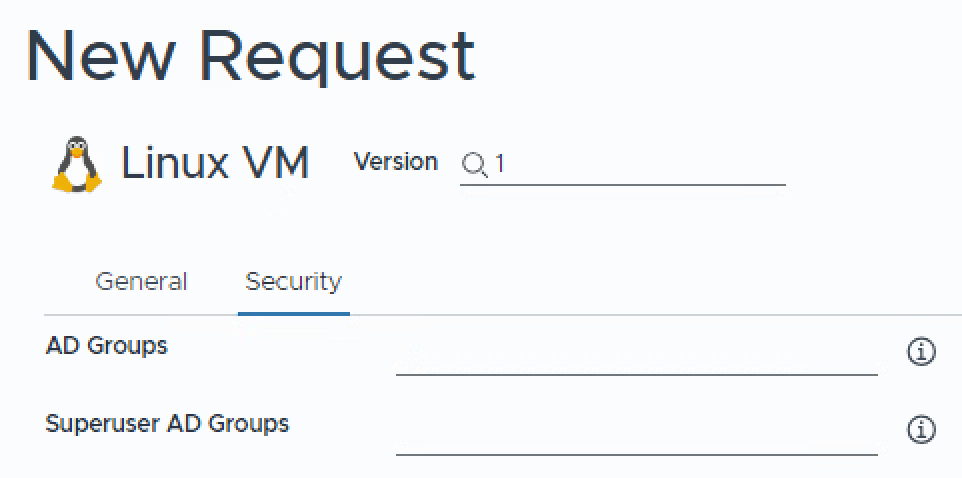
Now select ADD TAB to create a new tab. On the right hand side of the screen, change the Title to Security, and Visibility to Yes.
Drag and drop the AD Groups and Superuser AD Groups objects from the left menu onto the canvas and re-arrange them as you want.
Now click Create to save your customized form.
Just as with Templates, you can create a Version, so go ahead and click Version, let’s call it “first custom form”, and click Create.
Finally, click Enable in the top menu, then Save.
Now click Consume in the top menu, and Catalog again.
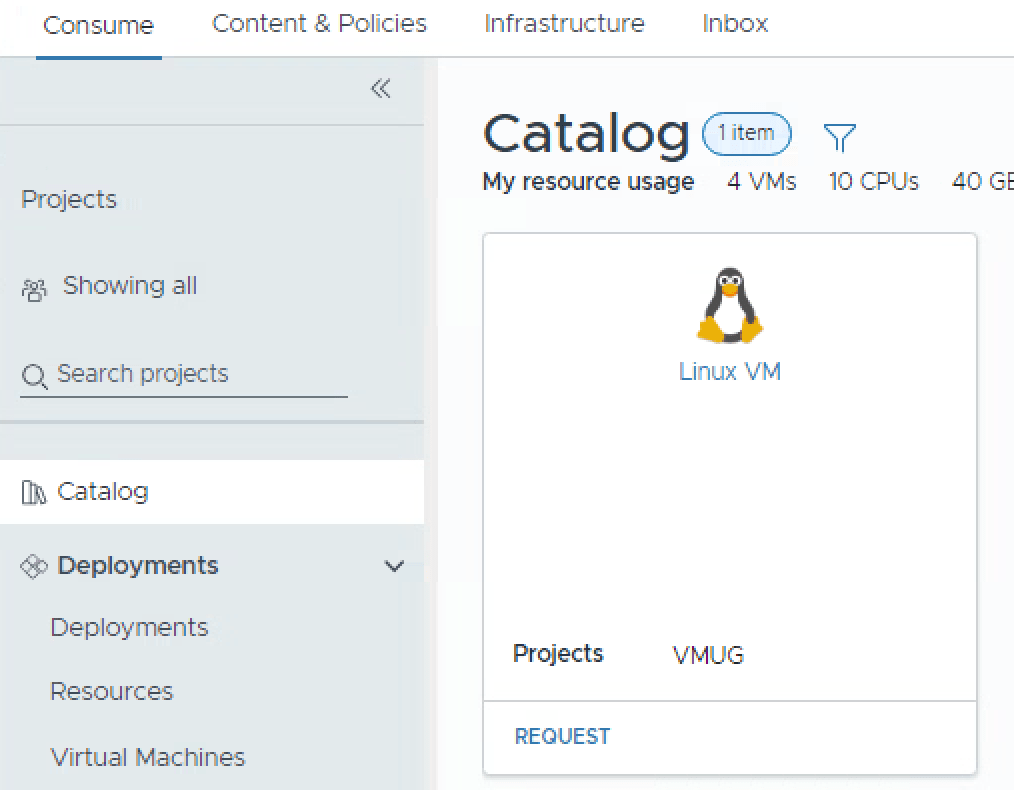
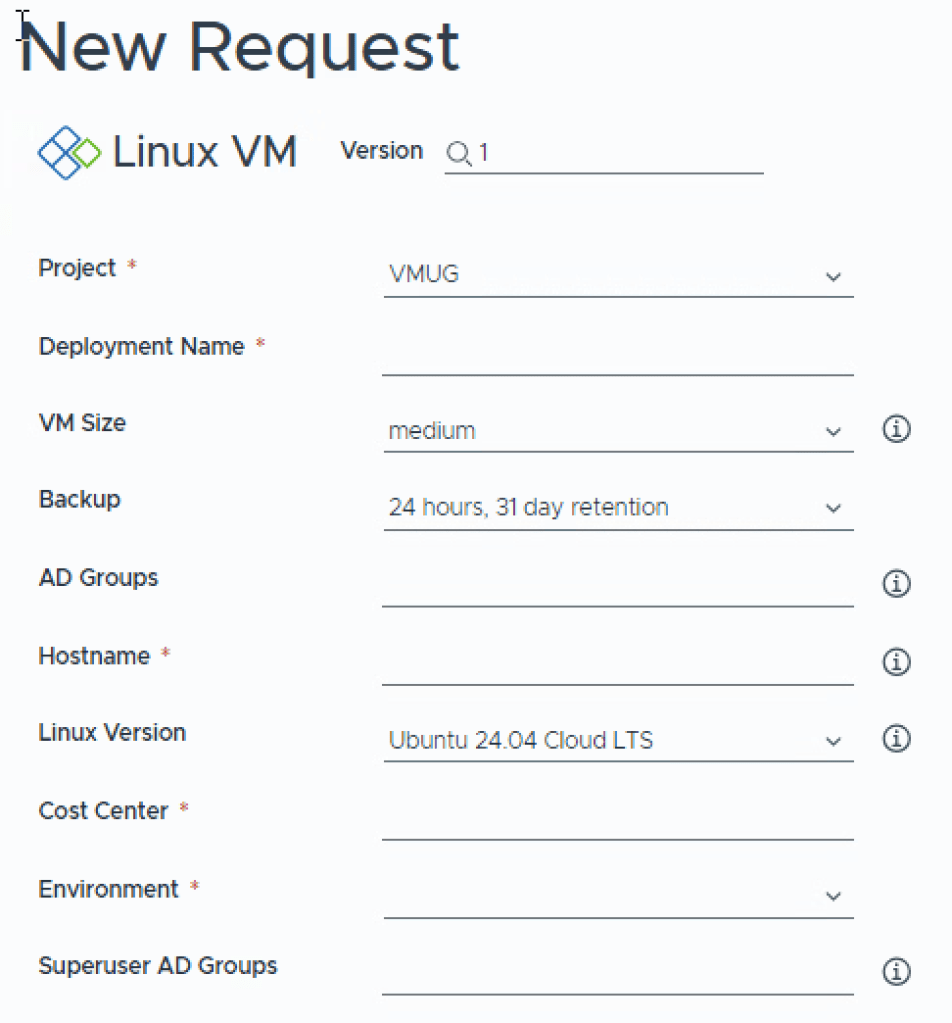
You should now have a pretty item to consume with a Tux penguin, click Request again. Hopefully, you will now see your custom form.
Wrapup
So this was a really long post, but we’ve now successfully concluded how to create our first Automation Template, that create’s a solid foundation for a Linux machine, along with all the “do once” things like setting up a Content Source and creating a Sharing Policy. We even made the blueprint look pretty! In the next part i’ll go through creating a Windows Template.

One thought on “Part 4 – VCF Automation – Ubuntu Template”