Housekeeping
So now let’s start to configure some basic stuff that we’ll use in the automation.
Networking
To both be able to create our Templates, and be able to provision VMs somewhere we are going to require networks. Out of the three pillars Compute, Storage, and Networking/Security, the Networking/Security part is always the hardest to automate, unless you have an SDN! (Software Defined Network). Lucky for you, VCF comes with NSX Networking to help you easily be able to provision static, and on-demand networks, never having to see a ticket!
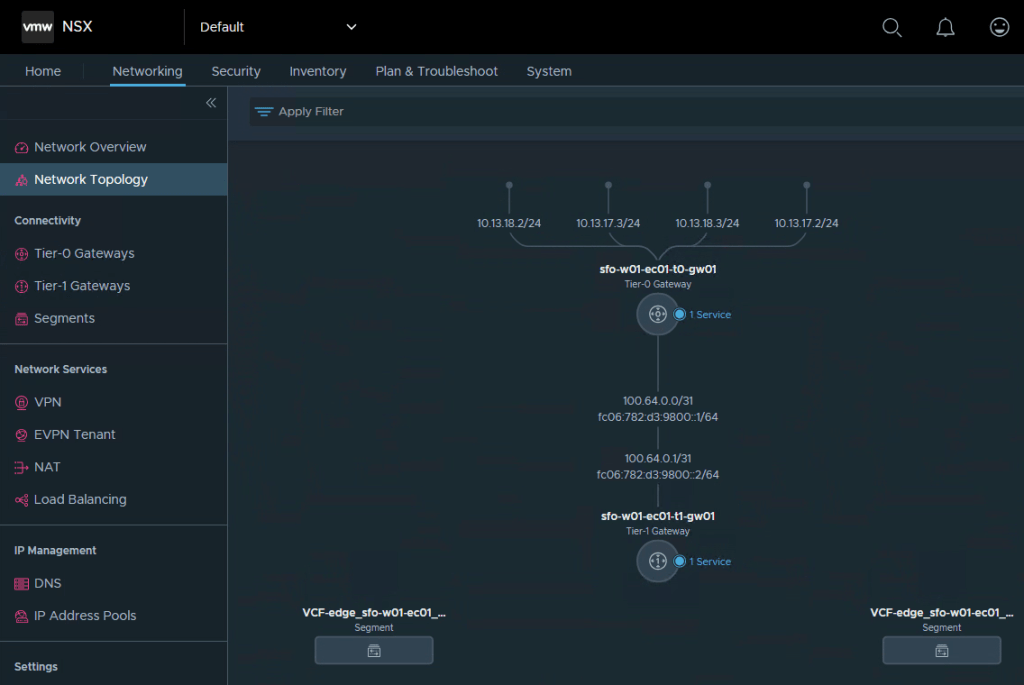
Login to your Workload Domains NSX Manager (e.g sfo-w01-nsx01.sfo.rainpole.io).
Select the Networking menu, and select Network Topology on the left hand menu.
After you deploy a Cloud Foundation Workload Domain you have the option to lauch a wizard that helps you provision your NSX Edge Cluster that will be responsible for routing your logical networks out onto your physical network. If you followed the wizard this is what your environment should look like.
The T0 router is a routing instance that is in charge for your North/South traffic, in other words routing traffic between your physical network, and your software defined network.
The T1 router is a “service router”, you can have lots of T1 routers depending on if you want to have one per tenant, one per customer, one per application, your options are endless! You can also run services, such as DHCP, NAT etc on these.
For now, let’s just use the T1 router that the wizard created.
In the left hand menu, select Segments, and then Add Segment.
Fill in templates as the name, select the T1 instance as the connected Gateway, and enter a CIDR (e.g 192.168.1.1/24, note it wants you to define the IP which will be used as gateway)
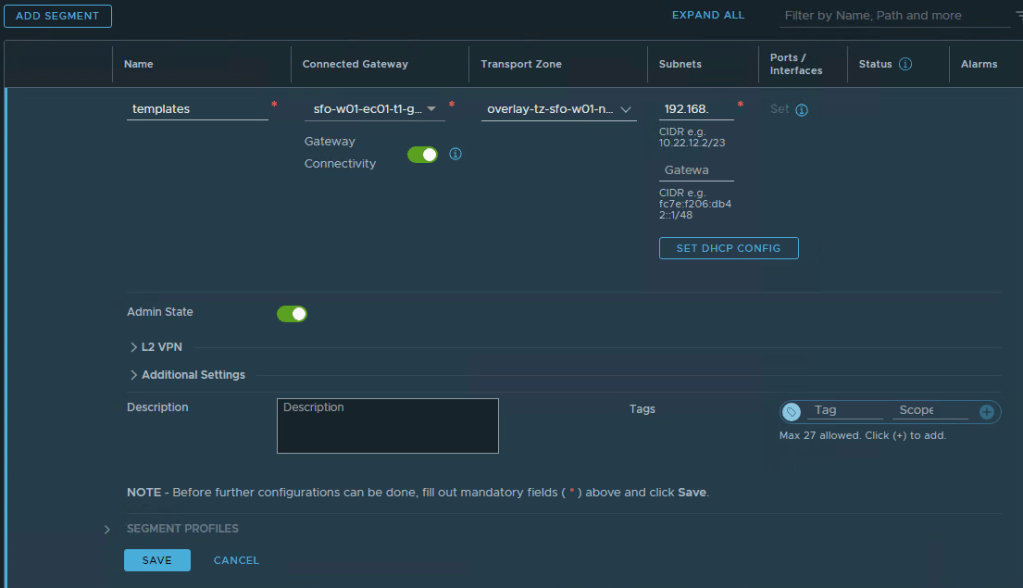
Before clicking Save, select Set DHCP Config.
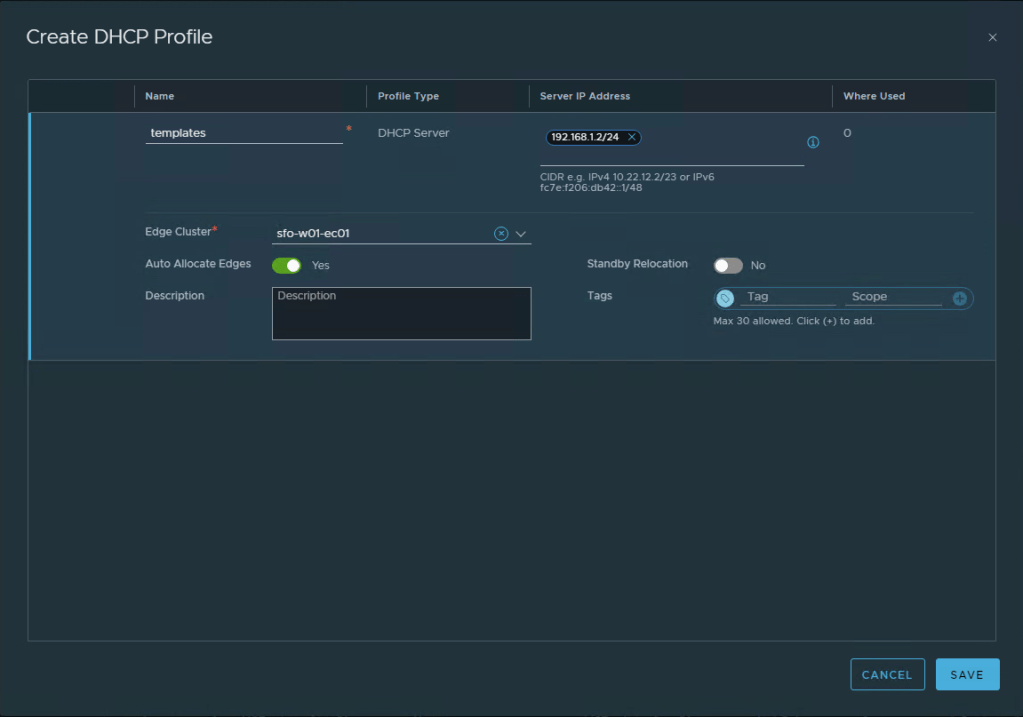
Leave the DHCP Type as Segment DHCP Server.
Next to the DHCP Profile, click the 3 vertical dots, and select Create New.
For the Name, call it templates.
Server IP Address enter the next available IP in the network, not the same as gateway! (e.g. 192.168.1.2/24).
In edge-cluster drop-down, select your edge-cluster.
Select Save.
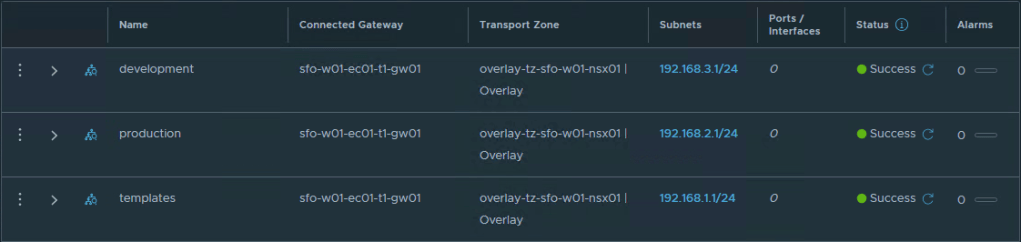
Now let’s finish up by filling in the DHCP Server address (same as in previous), give it a range, and type in your DNS servers. After each DNS entry hit [Enter] to get it to populate.
Click Apply, and then Save. Select No when asked if you want to continue editing.

Now re-do this two more times but create a Segment called “production”, and a segment called “development”.
If you head over to your vCenter (e.g. sfo-w01-vc01.sfo.rainpole.io) you will now also see these overlays pop up under your Networking view, just like a VLAN backed PortGroup. Only difference is you’ll see a small N character showing it’s an NSX Segment. Your T1 will now be advertising the network to your T0 Router, and the T0 router out into your physical network. You should now be able to ping your segment gateways from your desktop.

Content Library
First we need to download some ISOs and OVAs that will be used later. Let’s download the Ubuntu ones first.
Something to notice here is that we are download the -cloud images for Ubuntu Server. This means it’s a fully prepped Ubuntu OVA that already has cloud-init configured, we don’t need to actually create and maintaine a template. This is going to be very important going forward, and is likely one of the best friends, but also largest friction points you will experience. Cloud-init will help you both in Windows and Linux to bring your base image to just that, a base image that is usable for further automation.
Ubuntu 20.04 LTS Server Cloud https://cloud-images.ubuntu.com/focal/current/focal-server-cloudimg-amd64.ova
Ubuntu 22.04 LTS Server Cloud https://cloud-images.ubuntu.com/jammy/current/jammy-server-cloudimg-amd64.ova
Ubuntu 24.04 LTS Server Cloud https://cloud-images.ubuntu.com/noble/current/noble-server-cloudimg-amd64.ova
Once done, login to your vCenter server for your workload domain (e.g. sfo-w01-vc01.sfo.rainpole.io)
Click the “hamburger” menu and then Content Libraries.
Click Create to start creating a new library.
Input Automation into the Name field, Select Next until Stage 4.
Select the the suitable storage. Select Next and then Finish.
Ubuntu
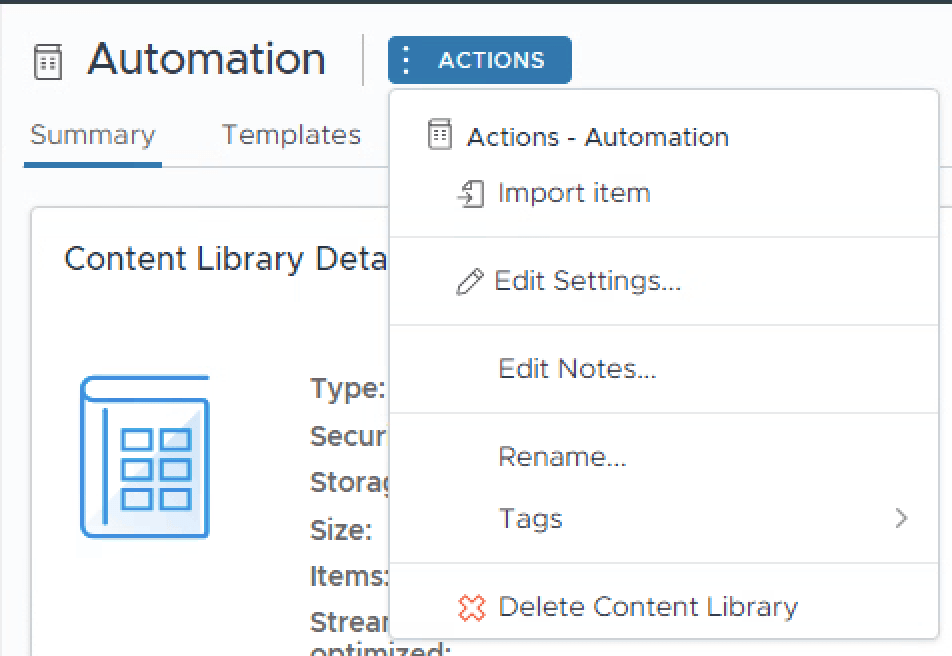
Select your newly created Content Library and click Actions dropdown next to it’s name, and select Import Item.
Select the Local file radio button, and Upload Files.

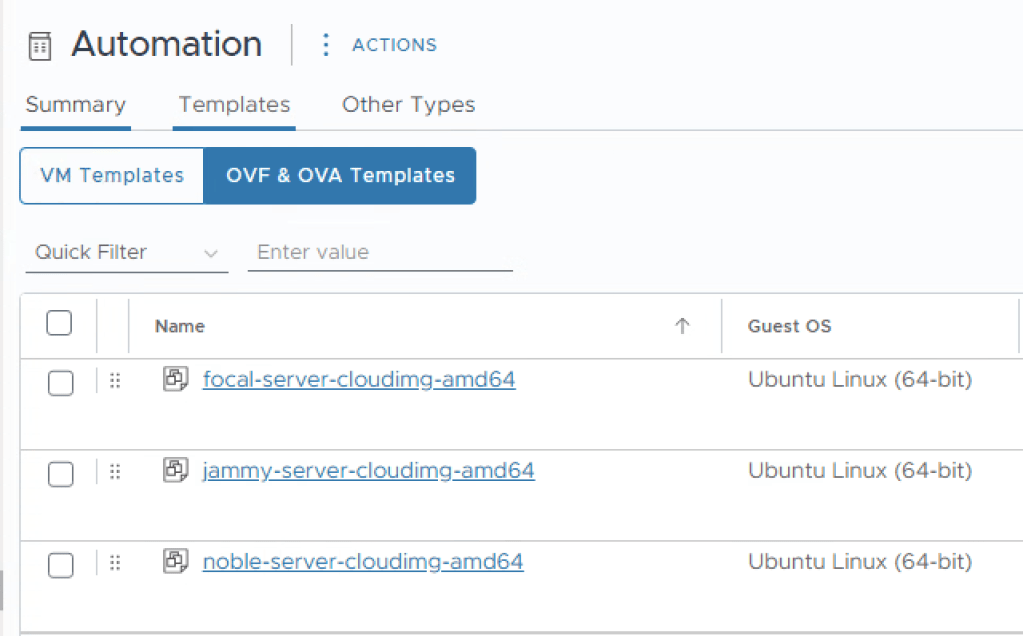
For each file, click open, leave the defaults and select Import. Now navigate to Templates, and select OVF & OVA Templates, you should now see 3 images that are ready for deployment!
Windows
Since Microsoft Windows ISOs arnt available publically, download the Windows Server 2019, and Windows Server 2022 ISO images.
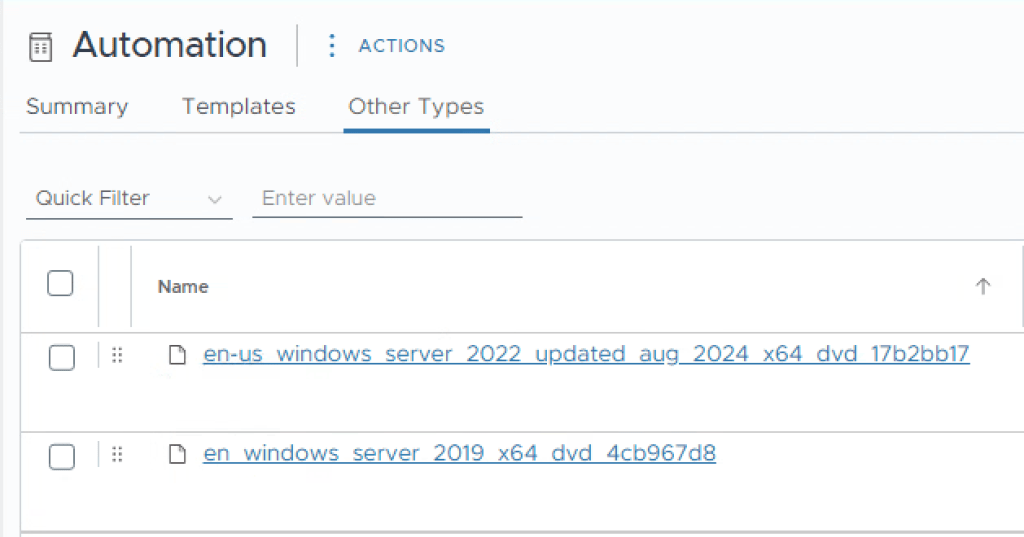
Select Import Item again, but this time select the microsoft ISO images. Once uploadad these will appear under Other Types as ISOs.
You now need to proceed to install two virtual machines that will be used as templates.
– Install Microsoft Windows 2019 / 2022 using “Desktop Experience”.
– Install VMware Tools
– Run Windows update
Once this is done, we need to install Cloudbase-init , note this is called Cloud-init for Linux, but Cloudbase-init for Windows. I found an awesome blog on how to do this here: https://blog.v12n.io/installing-cloudbase-init-on-windows-for-vra-customisation/
Rather than copy the content of the blog, carefully install Cloudbase-init, replace the configuration file, and delay the startup. Please take great care with the config file, any type’o and Cloudbase-init wont work.
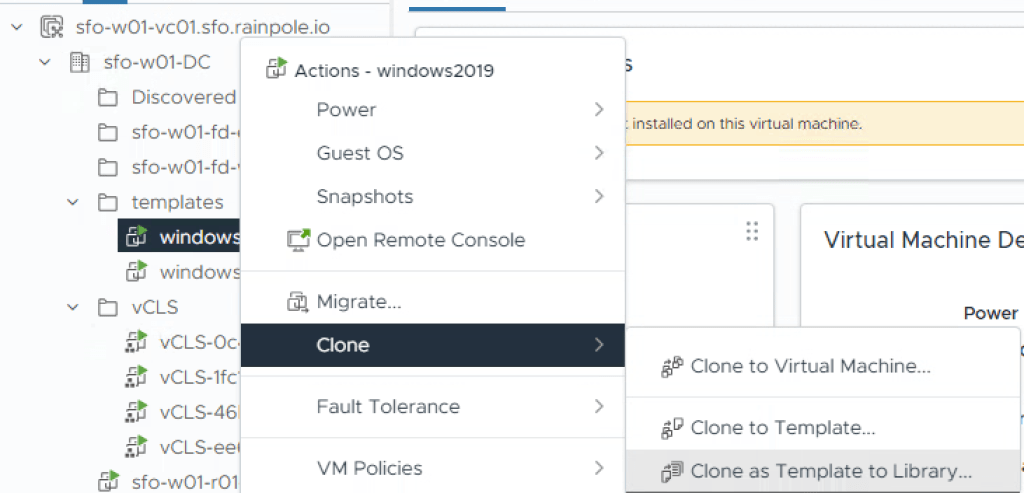
Once the VM has been shutdown, proceed to clone it to your content library.
Call the templates the following, this will make sense later that we have a structured naming convention.
windows-server-2019
windows-server-2022
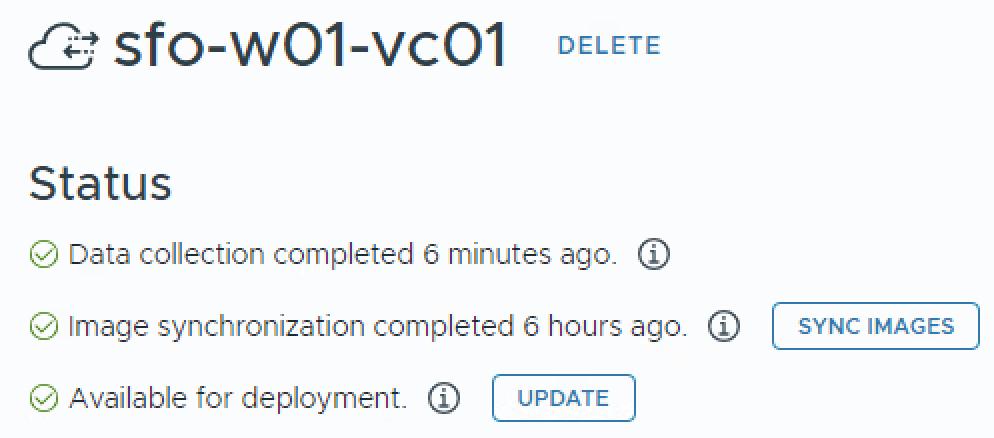
Now, one thing that got me is that VCF Automation doesn’t instantly pick up on changes to the Content Libraries, it’s polled on a interval. To manually request a synchronization for the next steps, login to your VCF Automation instance, and go into Assembler.
In the left hand menu, scroll all the way down to Cloud Accounts, select your vCenter.
It will displays the last time images where synchronized, select Sync Images.
Projects
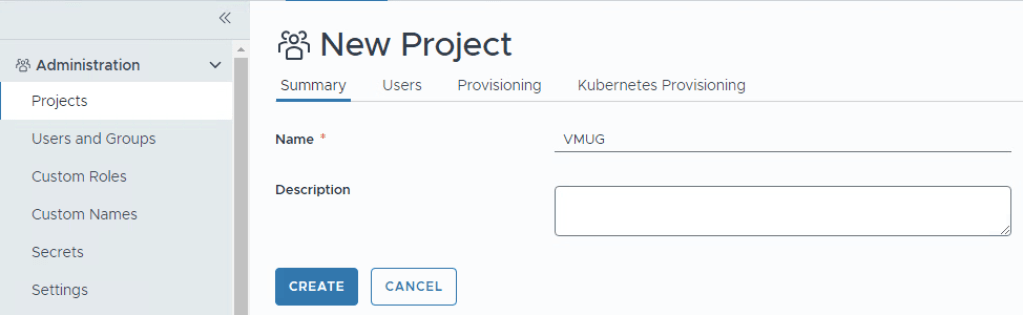
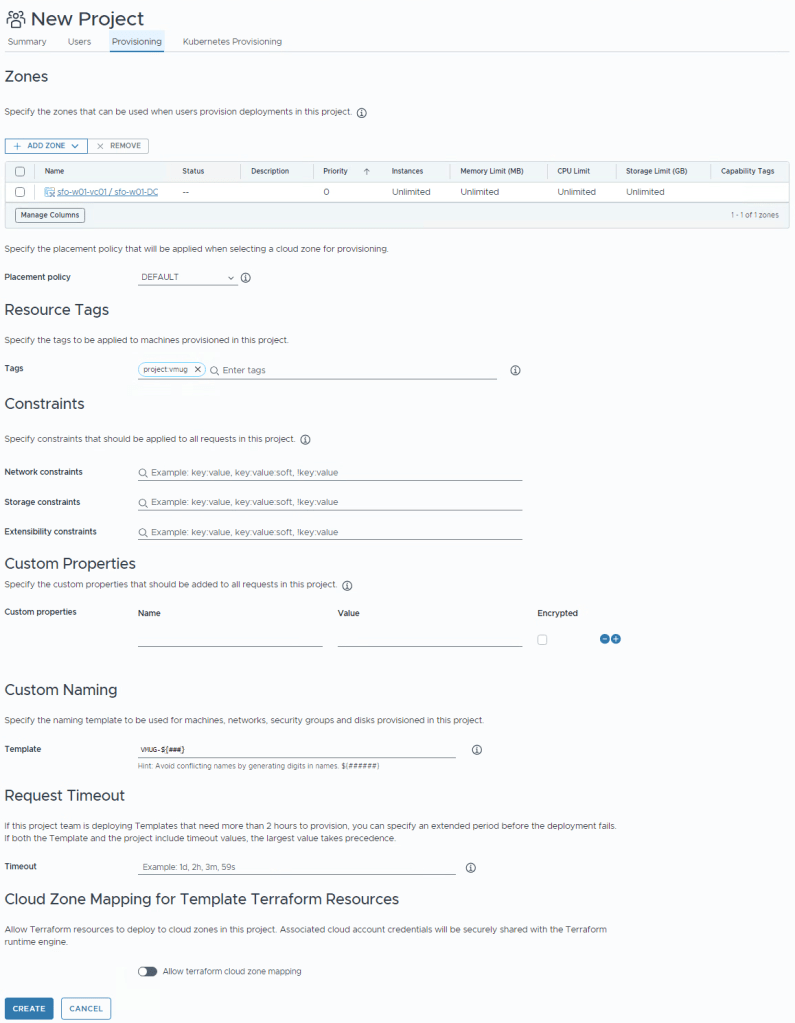
Now lets create a Project, in the left-hand side menu, under Administration select Projects.
Before clicking create, select Users. I’m adding myself as an Administrator, and Martin as a Member.


Now select the Provisioning tab.
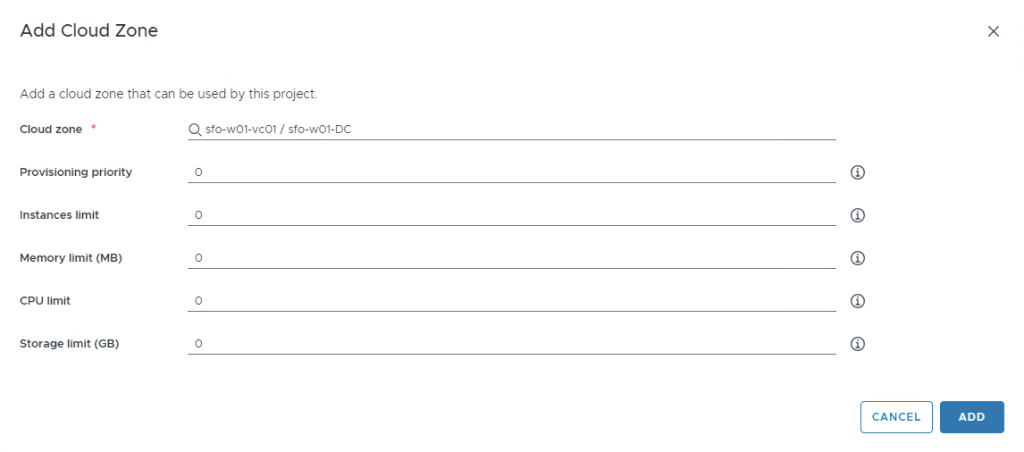
Under Zones section, select the Add Zone dropdown and select Cloud Zone.
this allows you to select the Cloud Zone that we previously viewed (that creates VMs in the Folder, and in the Resource Pools defined). You can go ahead and set limits if you want to, in a production environment this may be welcome to avoid those users who think resources are free.
Click Add.
Tags can be really useful to do dynamic stuff, if you want go ahead and create a tag like project:vmug so that you can later filter on VMs provisioned by this project. (Maybe create a custom dashboard in VCF Operations?).
Constraints is a dymanic way of letting the automation know what you allow, and don’t allow. Let’s say you have Secure, and InSecure networks. You want to make sure that this Project can only deploy things to the Secure networks. You could then add this as a constraint so that the automation will never permit things to deployed incorrectly.
You may also have two different storage technologies, if you want this project to only be allowed one, then add this as a constraint. For now, i’m going to leave this blank.
Custom properties is metadata that will be appended to all deployments, a good example of this might be a cost-center that you later on want to via API gather information for, to input into a chargeback system.
Custom Naming, now this is a divider. Most people will be used to treating VMs as “Pets”, giving them bespoke names. When it comes to Automation, your life will be much easier if you re-evaluate whats really important to avoid building yourself into complex corners. We refer to naming as “Pets vs Cattle”, the name of the virtual machine really shouldn’t be all that important, so even though you may call your cat Henry, if you’re a farmer you would call your Cow 2971. You’re a farmer now, an IT-Farmer.
I’m going to enter VMUG-${###} , this means that my virtual machines will use a generated name like VMUG-001, and VMUG-007.
Your project should now look something like below. Go ahead and click Create.
Flavor Mappings
In the left hand menu, under Configure select Flavor Mapping.
Flavors are how we abstract what we mean when we say “Small”, “Medium”, “Large”, “Standard”, “Edge”, etc when it comes to size and shape. The reason behind this is that VCF Automation allows you to provision things to both Cloud Foundation, but also public hyperscalers. To easily translate what “Small” is in your Private datacenter, and “Small” is when it’s a Azure VM, we use these mappings.
Since i won’t be using any public hyperscaler in this tutorial, this may seem overkill, but this makes your automation dynamic and extensible for the day you may want to use a public hyperscaler also. I’m going to go ahead and add small, medium, large as below table.
| Name | vCPUs | Memory | Cores per Socket |
| small | 1 | 2 | leave blank |
| medium | 2 | 4 | leave blank |
| large | 4 | 16 | leave blank |
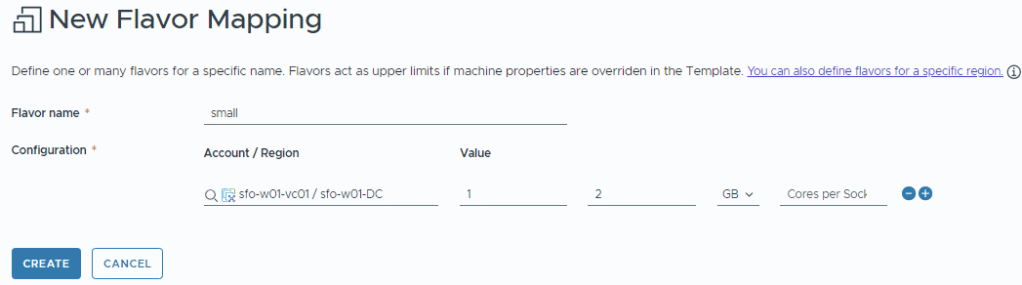
This should be your end result.

Image Mappings
Just as we describe what small, medium, large means to us in different clouds, we need to define what operating systems or images look like. For this tutorial i’m going to focus on two things, a Ubuntu, and a Windows Image.
In the left hand menu, under Configure, select Image Mappings.
Create a mapping with the Image name linux-ubuntu-server-20.04
Under Account/Region, select the Workload domain vCenter.
Under Image select the focal-server-cloudimg-amd64
Click Create
Do the same for all 5 images, according to below table.
| Image Name | Account / Region | Image |
| linux-ubuntu-server-20.04 | sfo-w01-vc01 / sfo-w01-DC | focal-server-cloudimg-amd64 |
| linux-ubuntu-server-22.04 | sfo-w01-vc01 / sfo-w01-DC | jammy-server-cloudimg-amd64 |
| linux-ubuntu-server-24.04 | sfo-w01-vc01 / sfo-w01-DC | noble-server-cloudimg-amd64 |
| windows-server-2019 | sfo-w01-vc01 / sfo-w01-DC | windows-server-2019 |
| windows-server-2022 | sfo-w01-vc01 / sfo-w01-DC | windows-server-2022 |
When you’re done it should look like this.

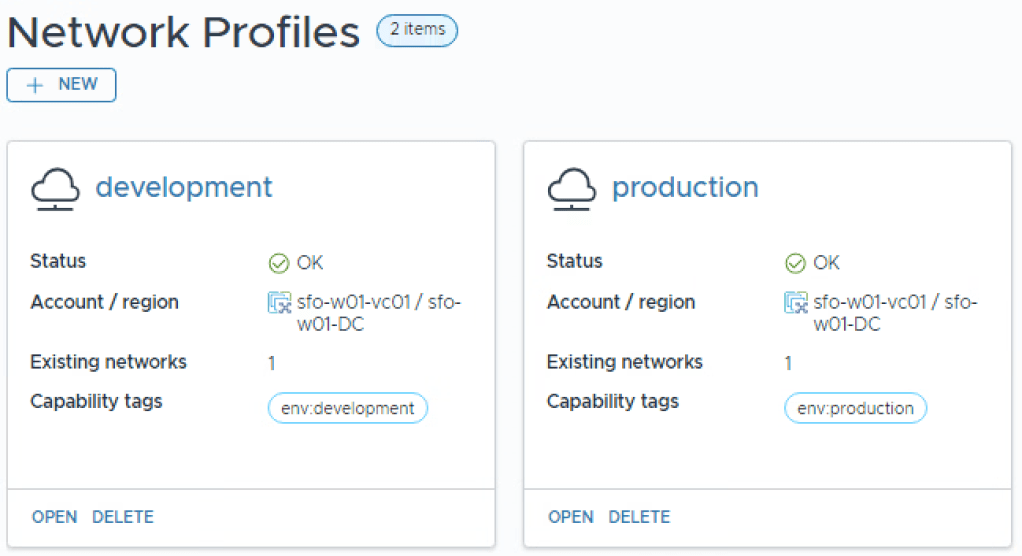
Network Profiles
Only a few steps left now until we can start creating automation blueprints. We need to be able to determine what goes to what network. We’re going to keep it quiet easy to get you to provisioning virtual machines, and leave on-demand and networks using static ips for later.
On the left hand menu, select Network Profiles.
Create a new profile and select your vCenter for account / region.
Choose production for Name.
Under Capability Tags, and enter env:production [enter], since the tag doesn’t exist, it will then be created. Don’t click Create yet.
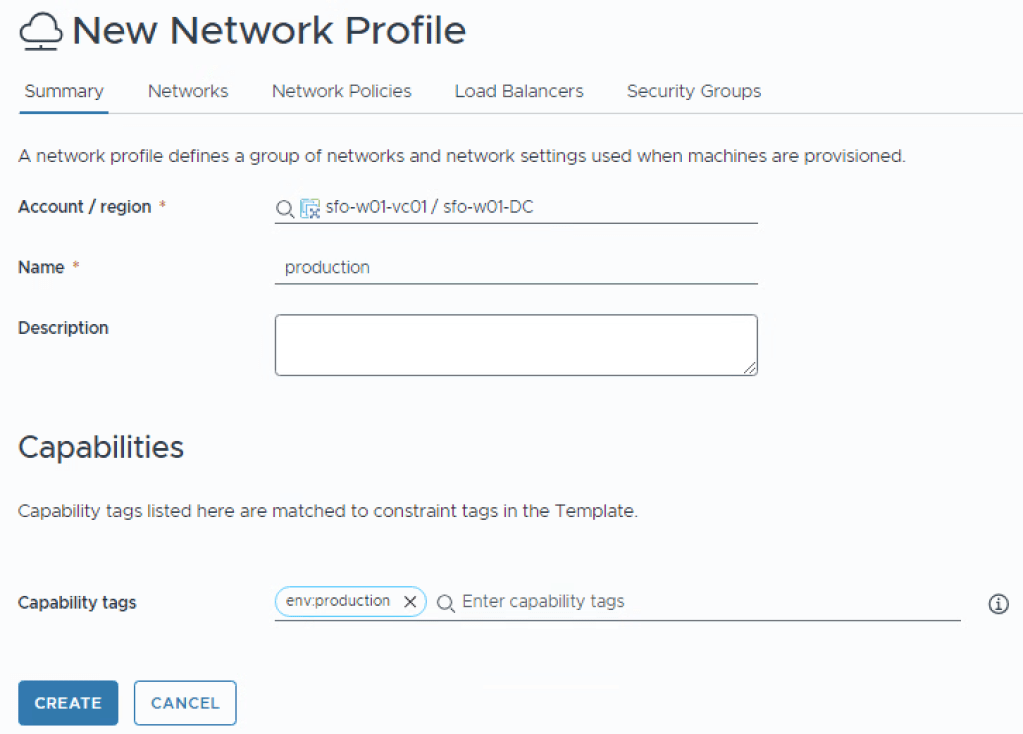
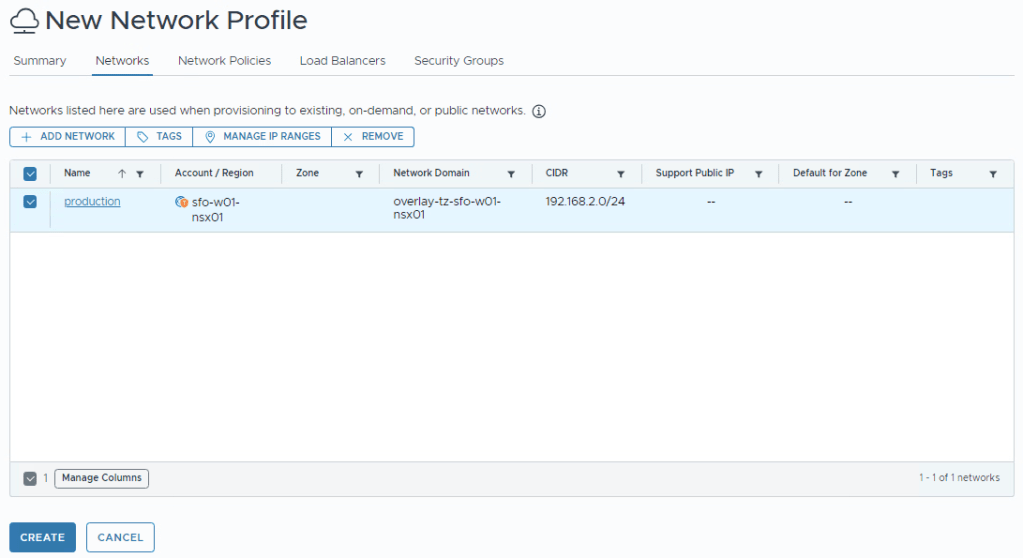
Select Networking in the top menu.
Select Add Network
Select production, click Add.
Now click Create.
Do the same for your development network, but replace the tag with env:development
Your Network Profiles should now look like this.
Storage Profiles
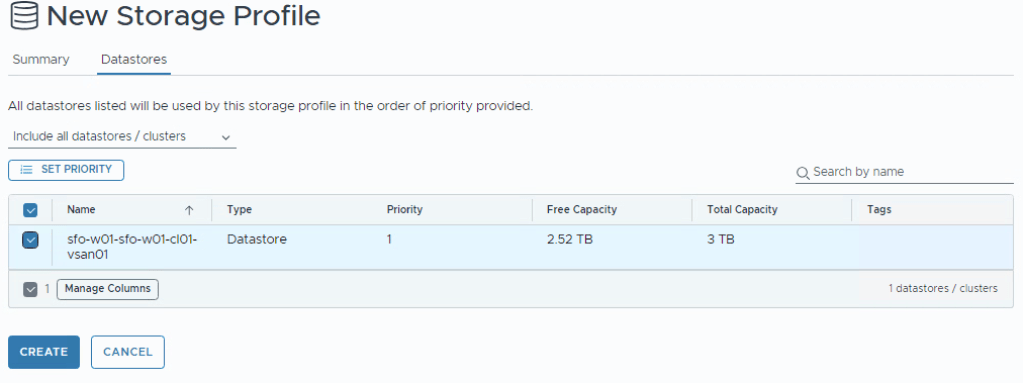
Last thing! we need to create a storage profile. Hopefully you’re running vSAN ESA and don’t really need more than one storage profile. Configure according to picture below. Before you click Create, Select Datastores in the top.
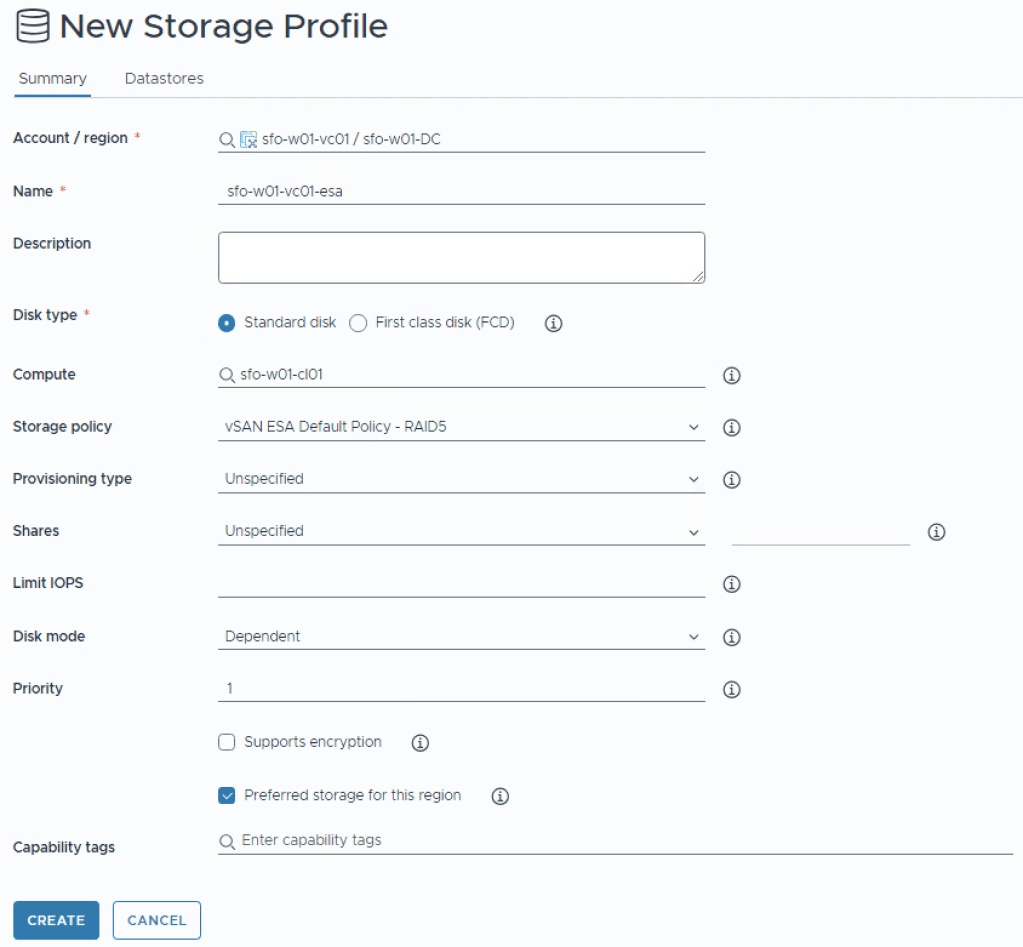
Select the vSAN datastore, now click Create.
Wrapup
We’re now finally done with all the housekeeping and groundwork. We’ve ensured that everything that will be used in an automation flow, will be agnostic from the under layers, which will make it easier to write automation for the near, and long term.

One thought on “Part 3 – VCF Automation – Housekeeping”